06 August, 2011

My Week in Cakes

I know a lot of you have regular posts about your week, and it usually involves photos and a brief description of what's going on.. so I thought I'd do one just for this particularly busy week I've had! I was supposed to be having a week off work for holiday but it just turned into a mad baking session! Business is booming here at Cakes by Kirsten, and I'm getting orders all the time! :D Remember to check out the Facebook page here, a 'like' is all it takes to get the word around :)
1) Sherelle's 21st shoe box cake; the shoe and roses are made out of Flowerpaste and finished with PME Clear Finishing Spray! 2) Luke's 18th Bra Cake; I got a call at 11am, the customer said the original cake was involved in an accident and needed another one by 6:30pm. I got there at 6pm. BOOM! 3) These vanilla cupcakes with vanilla buttercream are decorated with general supermarket sprinkles, but were sold to raise money for Breast Cancer Care! Over £230 raised!! 4) This chocolate fudge cake with chocolate buttercream cake is finished in the style of my Hello Kitty cakes, with edible sparkles. The tubing around the edges was created using my oh-so-nifty sugarcraft gun! 5) As simple as this victoria sponge is, I think it's flawless in my opinion! The flowerpaste numbers are finished with non-toxic glitter.

There you have it, a week in the life of a cake designer :) Children's cakes and a Glastonbury-themed engagement cake coming soon!

Happy Baking x

Red Velvet: Take Two!

Last year I had a disaster when it came to red velvet cupcakes. They were taking the USA by storm, and Brooke Davis wanted them for her wedding cupcake tower - so they must be yummy! However, the recipe isn't your usual vanilla-sponge-dyed-red cupcake, oh-ho-ho no! The 'velvet' comes from using buttermilk, which has a creamy consistency that gives the cupcakes a velvetty texture. They also have cocoa in, but it doesn't give a major chocolatey experience. It's more like when you have chocolate marble cake, and you like the taste, but can't really taste the difference between the chocolate and vanilla sections. I came across numerous recipes, all differing slightly from the previous, so I just took the easiest one I came across - YUK! They were like savoury bits of off-colour brown cupcakes. They went straight in the bin.

So I did a bit more research this year: typing "best red velvet cupcake recipe EVER!" into Google helped. Forgive me, I can't remember the website I got it from, but I have altered it slightly anywho - so no copyright troubles :)
Ingredients:
- 500g Plain Flour
- 165g Butter
- 500g Sugar
- 3 Eggs
- 6 tbsp Red Food Colouring (Or just use a whole bottle of SILVER SPOON colouring, NOT Dr Oetker. They come out orange!)
- 2 tbsp Cocoa Powder
- 1.5 tsp Vanilla Essence
- 1.5 tsp Salt
- 330ml Buttermilk (You find this alongside the cream in the supermarket - do NOT use regular milk!)
- 1.5 tsp Vinegar
- 1.5 tsp Baking Powder

Method:
1) In a large bowl, whisk the butter on it's own. Gradually add in the sugar and continue whisking.
2) Add the eggs, one at a time - continue to whisk.
3) In a separate small bowl, mix the cocoa, red food colouring and vanilla together. Add to the batter.
4) In another bowl, mix the salt with the buttermilk. Gradually add to the batter, alternating with the flour in three's.
5) In your final bowl (sorry, lot's of washing up!) mix the baking powder and vinegar until it fizzes. Finally add this to your batter.
6) Separate into baking cases to just over half full and bake for 25 minutes. Cool on a wire rack and swirl on your choice of buttercream or cream cheese frosting and decorate!

I had a load of mixture left over, and couldn't be bothered to use up any more bun cases, so I just bunged it into a loaf tin! I'm not the biggest fan of cream cheese frosting - the red velvet cake I had in New York had meringue frosting... I think! - so I decorated mine with vanilla buttercream and the crumbs from the loaf tin. I never really intended on blogging this baking experience but because I was so pleased with the taste (not my finest presentation moment!) I thought I best share with you guys!

P.s Supermarkets are cottoning on to this trend, too. Don't try Morrisons Red Velvet cupcakes, the buttcream is ROCK hard and the sponge is dire. Tesco have their own variation, which they describe as 'chocolate cupcakes with a chocolate-filled centre', but I have yet to try them!

Are you from the US? Do you have a particular Red Velvet recipe you can pass on to us across the pond?? Comment below!
Happy Baking! x

The Baker's Back...

Over a month since my last post - I'm so sorry!! I've had probably the most hectic few weeks of my life recently and suddenly become a responsible adult by moving out of my parents' and in with my gorgeous boy!! As you all know, I've started a small business called 'Cakes by Kirsten' and this has been one of the reasons for my shoddy blogging! Here's what I've been up to over the weeks...


1) Martini Glass Cake - 2) Willy Cupcakes - 3) Lady Gaga Cupcakes - 4) Holy Communion Cake - 5) Blu Parrot Cake - 6) Fresia Fruit Wedding Cake - 7) Oliver's Christening Cake - 8) Paula's Pirate Cake - 9)  - Red Velvet Cupcakes

I know it must be super boring that I haven't been blogging my recipes lately, and have gone a bit bigheaded with the whole "look at what I can do!" motion, so I'll post the recipe to the Red Velvet cupcakes in a few posts' time :) 

13 June, 2011

Cooking up a Cookson

A book cake? Yeeeeahhh, sounds easy enough! I assumed when I was asked to do this that it would be something simple, like the Twilight books, or a bible (ha!). Nooope! It was "The Dwelling Place," by Catherine Cookson. Now I've never heard of this book, so after some googling I was petrified about the cover. All the editions bar one had photographs on the front, and I'm really bad at recreating people (see Princess Tiana :p), so I went ahead with the edition that had a painting on the front.
I covered the victoria sponge cake in the usual way, then attacked the image on the front cover by doing it in sections. I started with the foreground, the rocks; then the river; then the hills; and finally the clouds. I used a marbelling technique of rolling different coloured icings together to get this effect, which was really frustrating because if you over-knead the icing it just becomes one colour - so you have to work very quickly with it!

I again used my sugarpaste gun (my favourite piece of equipments by FAR! THANKYOU in-law's!!!) for the lettering. The thinner letters you see for the title really took a toll on my hands though: I used a very small hole stencil to get the thin snake-like icing, and my god, you really have to pump the gun to push it out the other end. My poor hand is now blistered :(

Above: What I was trying to recreate!

After delivery, I received a really lovely testimonial from the lady who ordered it, so I thought I'd share it with you: "hi kirsten thanks for the cake everyone loved it and mum was over the moon with it she was nearly crying ,she said it was beautiful and you were very talented you made an old woman very very happy thank you so much hun."

AWW. Happy Baking amigos x

08 June, 2011

Kaci's Christening Cake

This is my favourite cake I've ever made. 

And also, it's the first I've made for someone I've never met! They found me on my Cakes by Kirsten facebook page, and requested this modern girly christening for her daughter - no frills, no cutesey additions, just girly and pretty.

So I asked her what she'd like - bows? Booties? Butterflies? Blossoms? Check to all the above! And then she saw the Anniversary cake I'd done last year with the wire and icing decoration, and added that, too! She asked for it to be baby pink on the bottom layer, and white on top. I suggested we cover the cake board in a gorgeous fuschia colour, so the colour graduated down the entire piece, which she was happy with.


I hand-made these baby booties out of flower paste, which is a strong version of sugarpaste. After attempting to use the latter first, the booties just fell in on themselves and held no shape at all. Flower paste is a little more pricey - about £4 a pot - but it was worth it when I shaped the booties and they actually stayed up! I did mess up a bit though, the stencil I copied off I used the wrong way round, and the bootie strap fastened in on itself, instead of sitting pretty on the outside. To rectify this, I added stamped-out mini blossoms and affixed them to the side of the booties to look like buttons :)

The blossom cascade down the sides of the cake worked extremely well, in my opinion. I think they're really effective and are useful if you need to cover up any mistakes (mistakes? What mistakes?!) The teddy bear took no time at all, and was made out of sugarpaste. I think if you're keen on cake decorating, it's really worth investing in the equipment that's available to you. I bought a trio set of blossom and butterfly stampers, and it just takes so much time off your hands. Don't be ashamed to say you used them, all the best cake makers do!

Kaci-Ann's mum was really pleased with the cake, and told me later that all the guests agreed with her. I left some business cards with her, too, so hopefully I'll get a bit more business!

Anywho, I'm going to try some Red Velvet Cupcakes now - watch this space :)

Happy Baking! x

Can You Make a Corset? 'Course I can!

I'm heading ever-nearer to the June cake overload I have in 2 weeks, and I'm petrified!

So I had an easy one last week - the boyfriend's 22nd birthday! Jim didn't know what he was getting, and a few months ago all he suggested was "boobs." Hey ho, let's go! I've got the design to this cake in a book I got for christmas, and I thought it was a saucy (and err.. Classy?) version of the general tongue-in-cheek kind of naughty cakes you get.
I had a really big problem though - the boobs. How in the world do I make a boob out of cake? I know you can carve cakes to the shape, but I'm not very good at that. If I bugger up, that's it - back to square one. In the book all it said was to use "bowl-shaped cakes." Hmm. My local cake shop actually stock spherical tins (a ball of cake, what what?!?) so I thought yeah I could use them and just half the ball, but they were out for hire at the time I needed them. Crap! So I suggested to the shop owner that I had a (very) small Pyrex glass bowl - would that work? "Yes! It's oven-proof, just like when you make a casserole in a glass dish and bake it," she said. Duhhhh, what an idiot :P

So I painted the inside of the bowl in butter using a pastry brush, and added in the mixture. Baked for about half an hour, as of course the bowl is a lot deeper than a general sandwich tin. When the skewer came out clean, I carefully used a knife to ease the edges of the cake from the bowl, and it turned out a peferct boob shape!

The chest is just a usual 10in square cake, double-layered. I made a boob of it (de-dum-dum!) though, as when I had adjusted the shelves in my oven to let the cakes rise nicely, I accidently re-inserted them at an angle, and I couldn't understand why when I took the square cakes out, they had only risen on one side, and then gently sloped down the other. Oh god! What a blessing in disguise this was!! The instructions in the book had suggested that to make the chest of the corset, to carve it down to her waist, so it was higher near her boobs. Because of my error, no carving was necessary - the cakes sloped naturally down - hahaha!

I covered the cakes in the usual way, just separating the colours as I did so: the flesh icing covered the boobs, the lilac on the chest. I scored a line down the centre of the corset for the join, and then used the end of a thin paintbrush (one I only use for baking!) to make small holes either side of the line. Using my sugarcraft gun, I used a tiny circle stencil in the end of it to push out lengths of thin black sugarpaste, which were then cut to size and attached to the holes with edible glue in a criss-cross pattern. Using a slightly thicker circle stencil, I pushed out lengths of lilac sugarpaste for the corset bones. For the frilly edge at the top, I used a garrett frill stencil (it's like a circular cutter, with a frilly edge) to cut out a length of frill.

Jim was very happy with his boobs :)

Remember: Cakes by Kirsten can be found on Facebook!

Happy Baking! x

26 May, 2011

Cartoon Character Cakes

I've finally finished university!!!!

So, that said, I should really have more time to spend on my blog now. So here goes! Last week I had another cake double-whammy, and was up until 3am on Saturday morning finishing them off in time for a Saturday afternoon delivery. The things I do for my customers...

Fireman Sam
A good friend from university asked me to create a cake for her nephew's 4th birthday. More than happy to oblige, I made this Fire Engine cake complete with sugarpaste Fireman Sam (it's my first attempt at a sugarpaste figure, so please excuse his er... appearance!). The sponge itself is the usual victoria sponge with jam and buttercream concoction, which I had to cut specially into fire-engine shape before covering in fondant. I had a few problems with this cake, firstly, that Sam's head decided to fall off. Then the newly-built Sam fell over mid-delivery, but no harm done. I think I need some lessons on sugarpaste figures, though. Bit peed off with how he turned out :(

Homer Simpson
I am SO happy with how Homey turned out!!! I used a stencil to cut out the shape of him, then covered in the usual way with fondant. Then came the fun part of cutting out special shapes of his beard and shirt to match his body perfectly. Also, for my birthday, my in-laws got me a sugarpaste gun which I had wanted for aaaaaages - ever since Peppa Pig. It helps you create really perfect sausage shapes (and more, it comes with loads of shapes) without the icing breaking. As you can see, this is how I made the black outline of Homer, and I think you'll agree it works perfectly. I managed to keep his hair pieces in place by placing a thick cookbook under them, and left it overnight 'til the icing set in place :P This cake was made for Jim's dad's birthday party, and it went down a storm. It was gone by Sunday, which is what I like to hear!!

I have just recovered from two days filled with baking fruit cakes in preparation for July's cake orders, and am now taking a well-earned break until next week, when it's Jim's birthday :) Getting closer to moving day, too, so I'll have to do a post on my new flat :D

Happy Baking x

09 May, 2011

Come Dine with Kirsten

As part of a uni project, I had to create an interactive model of some sort that related to new media and something that interests me. So what interests me? Cooking? Bingo. I decided to host a dinner party, whereby each of the particpants could choose an ingredient of their liking to be included in the meal, and this was done by text messaging (interactive). The participants were:
1) James
2) Karen
3) Tony
4) Jim
5) Kirsten (myself)
I told the first particpant, James, one item that would be included in the meal. This was mozzarella. He then chose an item to match with this - pepperoni. The next particpant, Karen, knew the previous ingredient that James had picked. She texted me the next ingredient - chicken. I could see where this was going - they assumed I'd be making a pizza because of the generic ingredients of pepperoni and mozzarella. Nope, it wasn't over yet. The next particpant, Tony, knew of the chicken. I requested he suggest a vegetable to accompany this - he texted saying green beans. Jim then knew about the green beans, and I suggested he request a type of potato to accompany them - hence a full meal! He asked for mashed potato. As the host, I decided to add a flavouring now that I knew ALL of the ingredients in the meal and started to plan a dinner - paprika.

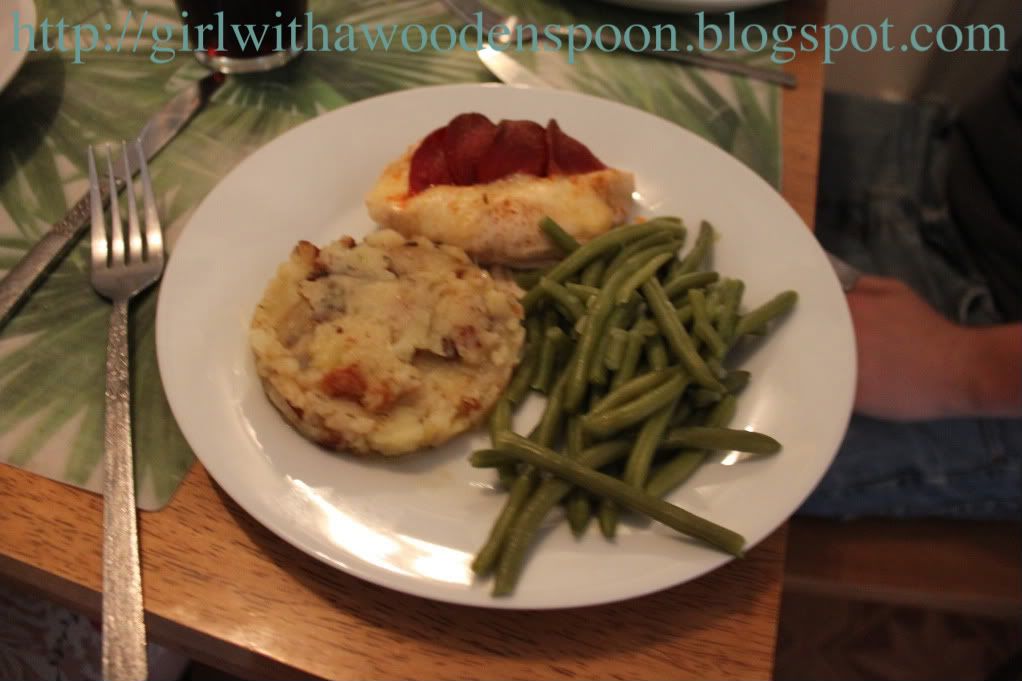
So - what to make?! I knew they were expecting a pizza of some sort. But that seemed too easy. I've always been good at 
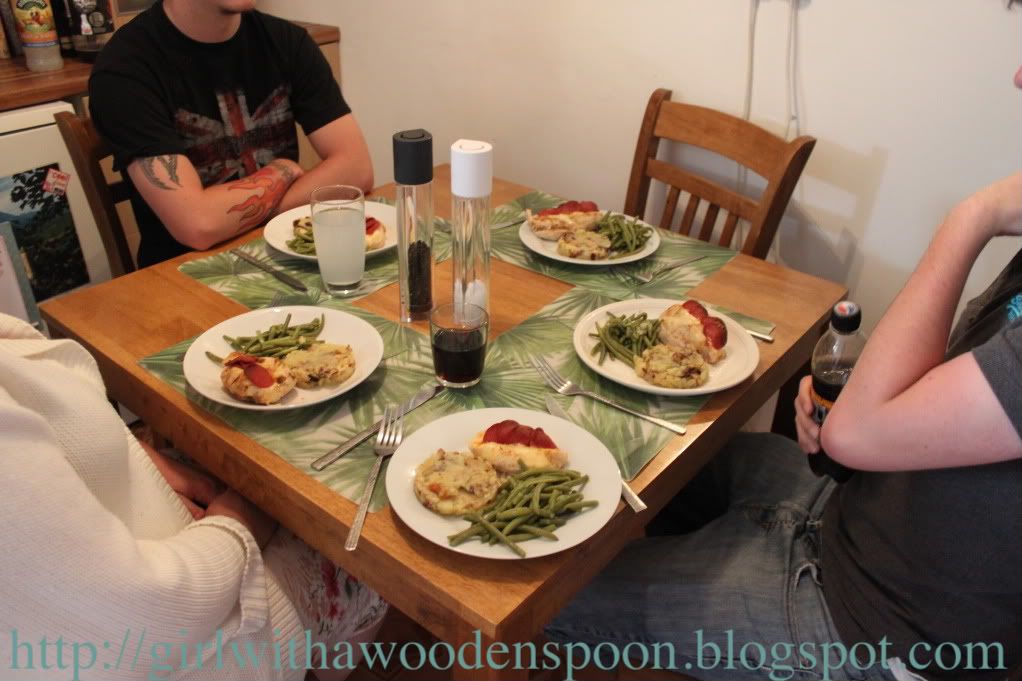
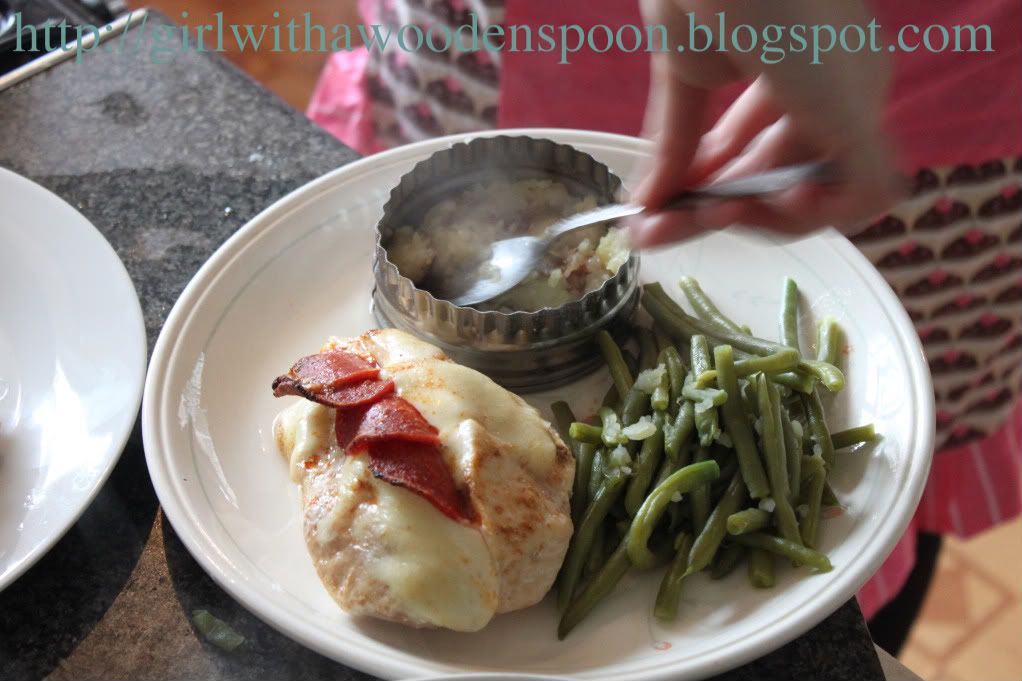
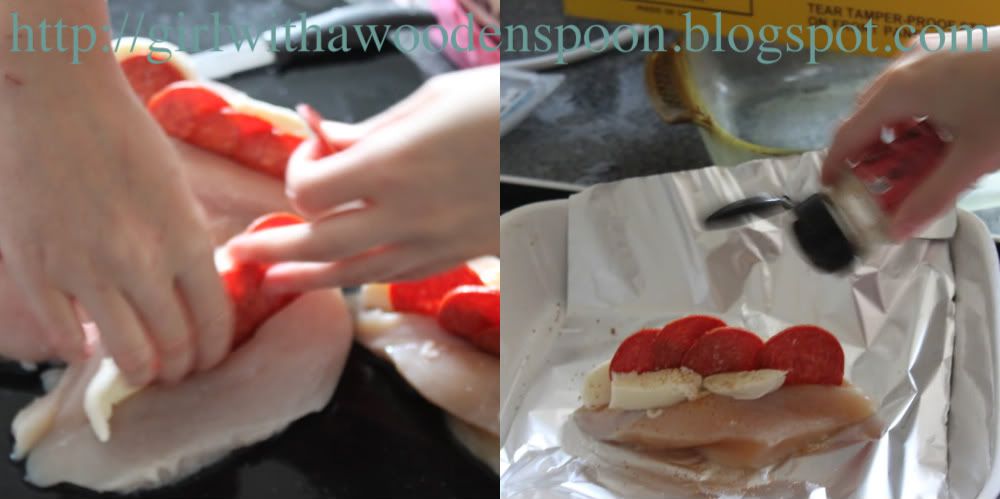
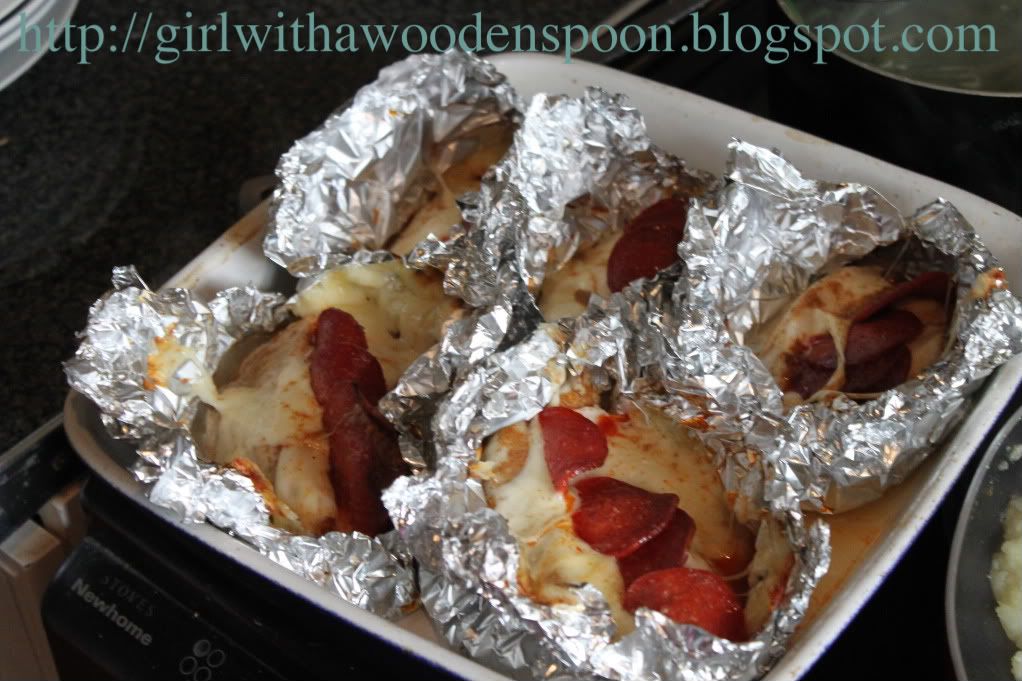
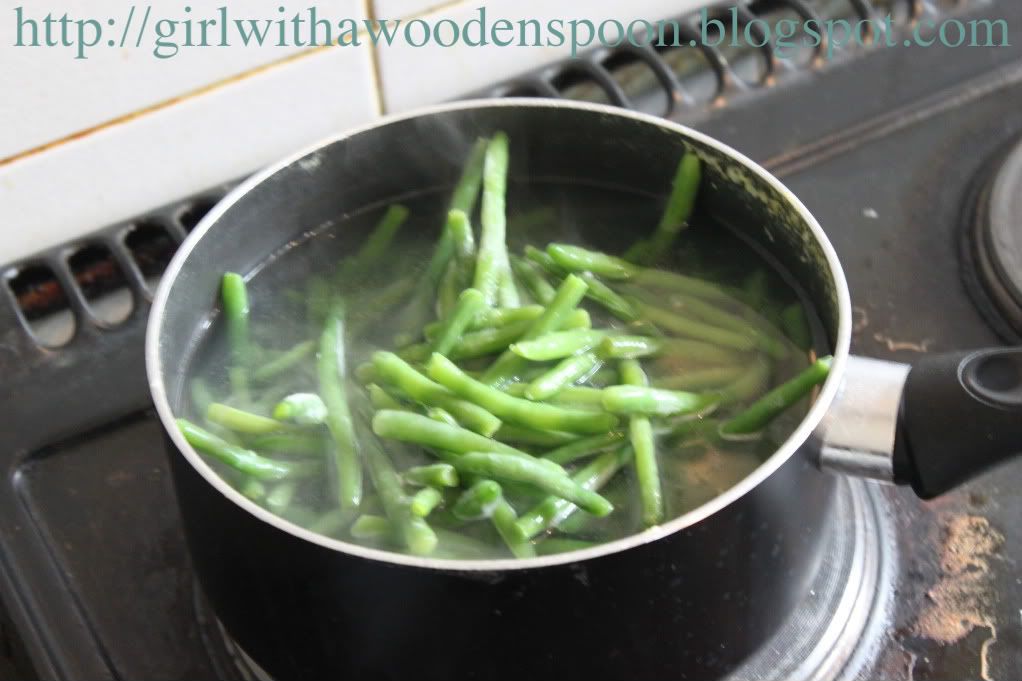
New York chicken so I made something similar to this. I sliced the chicken breasts down the centre, but not quite all the way through. Then I added sliced of mozzarella cheese and pepperoni. I prayed this was going to taste nice. I chose the paprika because I thought it would complement the spicy chicken well, and not make it too boring. These I then baked in tin foil for around 30 minutes, then removed the tin foil for another 5 minutes to crisp them up. I also like to serve green beans with NYChicken so this was a good match.
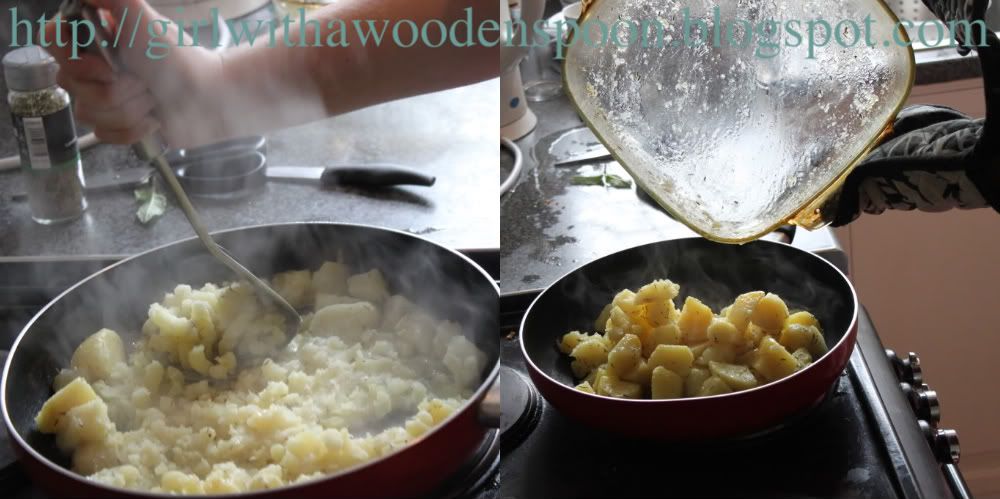
Now for the mashed potato, I decided to bring a modern twist on the traditional recipe. I recently went to a restaurant that served "crushed" potatoes - half mashed, half roasted/boiled? I'm not quite sure. But it was yuuuuummy. I thought this would be a good spin on the mashed potatoes, so to make them I boiled about 8 potatoes until they were very fluffy. Then I roasted them in a pre-heated dish for about 10 minutes to get them slightly crispy. Then for good measure, I transferred them to a frying pan and half-mashed them up. Add a little rosemary and garlic for some gooooood flavours!
When serving, I used a metal rings on each plate and spooned heaps of the mash into each ring, then pressed down. When you remove the ring, it gives a restaurant-standard quality of presenting the mash - nifty, huh!?
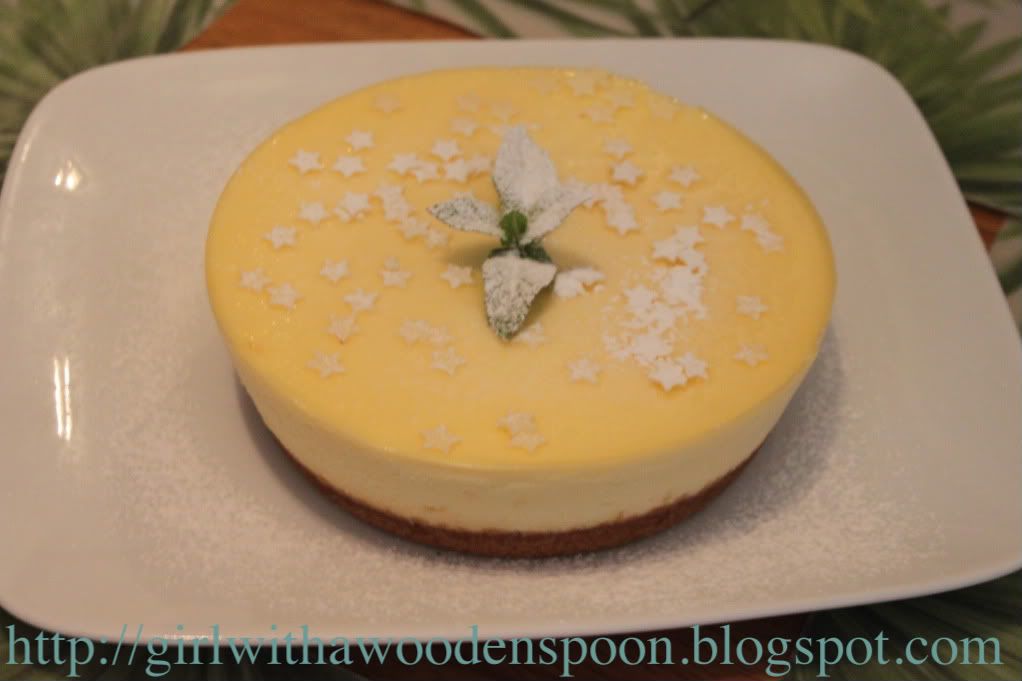
I chose Vanilla baked cheesecake for dessert, too. This was the majority result of a Facebook (new media) poll in my status - where I simply asked "Chocolate/Cheese/Fruit for dessert?" and six out of 10 friends replied "cheese."

Comments from the participants:
1) James - I really liked the meal. We were all expecting something like Hunter's chicken for dinner because that's what Kirsten always makes - don't get me wrong she does that well, too! So it was a nice change for her to do something different. I admit, when she said mozzarella I thought it was a pizza so that's why I said pepperoni!"
2) Karen - "Tasty, the mozzarella and pepperoni were a good combination with the chicken. Very morish!"
3) Tony - "A unique experience. I had a wonderful time."
4) Jim - "I think the crushed potatoes were amazing. I normally hate mash potato so that's why I challenged Kirsten to try and make me think different - and she definitely did! The chicken was good, too."
So, overall it was a good evening. I initially had doubts that this wouldn't work out well, hence why I chose to have some input in what type of ingredient could be included e.g. a vegetable. But I think the combination of chicken, mozzarella and pepperoni really worked out and I can't wait to try out crushed potatoes again!!!

Any feedback on this post is greatly appreciated and would be included in my final evaluation. I thought it would be an idea to get comments from my followers to see what your reaction to the whole process is, and how it could be improved/changed etc. Again, this is using new media and interactivity, so my tutor will be very happy! Many thanks for anything you say :)

Happy Baking x

Couple of Cupcakes

I'm getting more requests these days for cupcake orders. Naturally, they're the "in" thing right now and I don't doubt they are much more popular than my cakes. I've had two orders to do lately, the first was for Abby's auntie and uncle's wedding favours.

Chocolate Fudge Wedding Cupcake Favours

I had an absolute nightmare with these. They tasted amazing, don't get me wrong (yes, I can feel how big my head is). But because they had risen slightly in the centre, it was awful to ice with buttercream without it sliding off. The cupcakes were to go in clear plastic boxes tied with ribbon, so sliding buttercream was not a good look up the side of the box. So I wiped off the buttercream, started again. And again. And again. I was in tears trying to rectify the problem, and eventually had to cut the top of each cupcake off, swirl on some pre-made buttercream (because I had ran out of icing sugar and time was running out!!) and finish with some home-made chocolate roses. Remember how to make them? No? Find out here!
N.B Although watermarked, these images are actually courtesy of Abby's cousin - how amazing is this photography!!!
The favours came out amazingly (despite the smidgens of pre-buttercream you can see underneath the final swirl). They were finished with chocolate and cream organza ribbon and a label for everyone's names. Technically, these cupcakes acted as 1) favours, 2) name placements, 3) dessert! How efficient! Here's the second order:

Carrot Cupcakes with Cream Cheese Frosting

Now this was a challenge. I have never tasted carrot cake. I have never tasted cream cheese frosting. What the hell? I have no idea if they tasted like what they were supposed to taste like, but I made extra for my parents to be a judging panel. They liked them, and carrot cake is my dad's favourite so that had to be a good sign. Okay then, proceed.
My friend Emily from university got married last week - congratulations! She wanted a spin on the general hen party and organised a vintage tea party to have with her girlfriends - bunting included! She asked me to create these cupcakes with an assortment of coloured sugarpaste roses to finish. Suffice to say, this is probably the only cake order I've done where I haven't descended into tears. Wahoo!! She loved them, and even paid more than what I asked for them because of this! How generous?! (I think the gingham cupcake boxes added the extra pzazz, don't you? Oh I love the word pzazz lately!)
The roses are made in exactly the same method as the chocolate ones, with a star cut-out of green icing underneath for the leaves :)
Happy Baking x

Better late than never...

Ooopsie, a month since my last post? I'm a terrible blogger. As I know you're sick of hearing, I'm just awfully busy at the moment trying to finish uni. Good news - only 2 weeks to go and then I'm done! The past month has been a whirlwind of essays, photography, catching up with friends after New York, oh and of course the odd baking order ;)
So the day we got home from our trip, probably not much longer after I last posted actually, Jim and I found out that our family friends would like to offer us their flat they rent out. After 5 years together, we naturally jumped at the chance to finally live together and start an exciting new chapter to our life! We've been shopping around and taking advantage of the great event days homeware stores have been offering, and can safely say that we barely need much more for the new place - Asda have been cleaned out of their kitchenware. I thought Jim might start getting pains in his chest at the amount of stuff his baker girlfriend was picking up for the trolley!

Your blogroll is going to be chocka with a few posts from me now, sorry. But I've been doing loads, and they need to be separated accordingly :P

EASTER 2011

Easter has always meant a slap-up meal at the in-law's every year. As a thankyou (and dessert!) I baked a chocolate fudge cake decorated with icing and a chocolate cornflake nest with Mini Eggs. Not very adventurous, I know. But mother-in-law was very keen to try this recipe as I had raved about it after using it for wedding cupcake favours, and was annoyed that I just kept raving and not sharing :P

I did try my hand at making easter eggs this year, too. But the layer of chocolate inside the mould was too thin and my patience was wearing it aswell! So the melted chocolate went towards the cornflake nests :P
Also, my business - Cakes by Kirsten - is now up and running on Facebook! Please take a look around and feel free to "like." Plymothians - you're more than welcome to place orders! Haha!

Happy Baking x

04 April, 2011

Pussy Galore: Bumper Post

Hi y'all! Back from the Big Apple today so I just had to tell you about the recent cake extravaganza I embarked upon 24 hours prior to departure :)
I couldn't really say no to doing two cakes just before I set off on holiday - both were family orders and plus I really really wanted to do them. I was commissioned to make a Hello Kitty cake for my second cousin's first birthday, and a triple-whammy-James-Bond-themed-birthday cake for my other cousin's friends' party.
Phew.

So in a mere 48 hours I took upon the challenge of baking, icing and decorating two cakes, and here's the final results. (I haven't done a progress post this time as I was sooo strapped for time what with packing and uni-working too, so the final product is what you see is what you get.)

James Bond silhouette casino cake - Madeira Sponge with vanilla buttercream and jam filling.
Hello Kitty character cake - Devil Food Cake with chocolate buttercream with edible SPARKLES for decoration (note: no glitter - sparkles!!)

And remember the failed Red Velvet cupcake post I did last year? I tasted my first American-style cupcake from a little cupcakery on the stylish Madison Avenue and oh-my-goodness they are heavenly. Literally velvety, a hint of chocolate, and very frothy frosting! I HAVE to find a good recipe soon!!!

Happy Baking x

P.s I hope to set up a Facebook page soon for my 'Cakes by Kirsten' business. Link to come soon, I'd love your feedback!

21 March, 2011

When You Wish Upon a Star...

...Little Willow's dream's come true!
Remember the Peppa Pig cake I made a few weeks back? The owner's older sister, Willow, got her dream cake for her birthday on Sunday - a Princess Tiana cake! ( From Disney's Princess and The Frog.) Now, we had a few problems with trying to work out the design of Miss T, and I was originally going to make a doll cake with a cake doll pick pushed into the cake (which is effectively her skirt.) Unfortunately, for some idiotic and racist reason, LOADS of cake suppliers don't stock black doll picks, and the ones that do charge through the roof for them. So it was on to a flat design for Tiana, where my biggest problem was getting proportions right. Disney has the same motive as Barbie, where the ladies are all skinny, tall and gorgeous. This makes cake-making very hard, as skinny princesses are extremely delicate, and frankly won't feed a party-full of screaming kiddywinks. So, yes, she has a bit of a...ahem... full... neck, and my mum decided to tell me later on it would probably have been easier to just mould a head and neck out of cocoform. Thanks for telling me AFTER delivery, mum.
Anywho, despite this, she turned out okay, and the owner was very, very pleased with results - but then again I am my biggest critic. Also, I should make a note of telling people now - edible glitter is not actually edible. It's actually 'non-toxic.' Which in other words means it won't harm you, but it won't get digested either (sparkly poop??)
If you're thinking it looks fabulous on cakes and cupcakes, think again. It's messy, and used incorrectly is a huge pain is the bum. I managed to use it okay for Tiana's flower feature on her dress, but it just gets EVERYWHERE. Think I will make a note of banning it for future use. Hmm. Food for thought...

Look out for a chocolatey post at the end of the week - I'm back on the chocolate roses again for some wedding favour cupcakes! And stay tuned for a Hello Kitty cake next week before my jetset!!

Happy Baking x

08 March, 2011

If I Ever Made My Own 21st Birthday Cake...

This would be it!
Unfortunately, it's not for me. No one will be making me a birthday cake in 3 weeks time seeing as I will be away in New York (yes, I will mention it again :D). This cake has been made for business purposes! My gorgeous best friend Abby has kindly offered to help me with the advertising side of my 'Cakes by Kirsten' business once it's up and running, and I wanted a logo that would help define the company and myself. This is me all over - pastel colours, girlie, and BOWS! (I have a bow tattoo for a tramp stamp.) So this will be plastered all over my business cards, leaflets and website when I buy a domain.
This cake is also being used as part of my degree. One of the module I'm studying requires me and other group members to create a 32-page magazine from scratch, and then it gets sent to the printers! We're doing an article on independent business women, and who else to interview but moi! So a good friend Jodie will be doing the photography of this cake with me looking spanking in heels and an apron a la Bree Van De Kamp.

Anywho, the cake is entirely covered in white icing, using lilac, baby pink and baby blue ribbons and polka dots to finish. This is the first time I've actually been really pleased with the outcome of my bows. My mum's cake was too thick and didn't co-ordinate size-wise with the ribbon to match. The bow on Grumpy's christmas cake cracked on the knot, making it look silly :( I used the ribbon cutter tool to make everything even, and inserted a cake dowel right through the centre of the three cakes to hold them all together, aswell as the usual dowels in each layer (this prevents them from sinking into one another). The bows are made out of a combination of sugarpaste and Gum Tragacanth which helps harden icing to make it easier to mould into flowers etc. I used a few odds and ends to help keep things intact until they set properly though... Apologies for the crudeness :P
Remember back last summer when I did a few posts on Wedding-related happenings? The bride in one of the pictures, Laura is now pregnant! I wonder if she'd like this kind of cake for her Baby Shower? One can only ask.... ;)

Any questions feel free to ask!

Happy Baking x

18 February, 2011

Valentine's Day

I'm a bit late on my Valentine's post, sorry folks! But here's the cake I made for my other (not better, mwahaha) half since I'm a little skint these days (blame the holiday in NYC I just booked...!)... I received a sweet little silicone heart-shaped cake mould for christmas and I've been dying to put it to good use, so I googled for inspiration for a V-Day cake. Heart cakes aren't uncommon, but boy is there little imagination used! I saw one designed like this one, where the cake acts as an imitation chocolate box, and then added in a few Milk Tray choccies on top :) All of his family and friends were so amazed by it, to quote his mother "You clever girl, this cake is so beautiful. It'll be hard to beat...I've tasted this perfect perfect cake and it really is soooo perfect!" :P I think I need to set up a testimonials part of my blog haha!
What I'd like to mention about this cake task was the use of silicone moulds... HOW effective are they?!!? If you've never used one, buy one. There's no need for greasing and papering the cake mould, as you literally just turn it out of the mould. They're amazing, can't wait to make another one!
My Valentine's Day: The bottle with the candle in is the bottle of champagne my parent's drank at their wedding. Who say's romance is dead?

In reference to Valentine's Day, I'd like to have my own little rant. I think this year I've come across more "Ugghh I don't do V.D, it's so commercialised..." than soppy stuff and I felt really disheartened by it all. Personally, I love V.D. Jim and I have never gone completely all out for it, this year we stayed in with a rack of lamb and Sherlock Holmes, but it was still lovely to spend that day together celebrating how much we're in love. Yes, you can do that any day of the year, I know that. It's not like the words "I love you" are off-limits for the rest of the year. But I love the flowers everywhere, the candles, the cutesy presents and of course the chocolates. I'm not saying I'm materialistic, I just think it's a sweet day and everyone's all smiley. I saw a guy walk out of a jewellery store a few days before, and he had the biggest grin on his face and a tiny bag in his hand... I bet he was proposing and made someone a very happy and lucky lady. Anyway, I like the day. Some people haven't even been together long enough to celebrate an anniversary or whatever, so V.D is also a way for those people to have a special day, too. Before I met Jim, my best friend and I used to send each other Valentine's cards, just as a little reminder that we were there for each other. Rant over.

Happy Baking x

11 February, 2011

Peppa Pig Cake

Happy 4th Birthday Charli!
A friend at Uni asked me to do my FIRST COMMISION! for her daughter's birthday, and she was so excited by the results of this Peppa Pig cake that she's asked me to do her other daughter's birthday cake in March. I'm such a busy bee at the moment! I'm about to start a Valentine's cake tomorrow and then another next week... Ahhh!!

Anyways, so this is the progress of how I went from sponge to pig. Sorry guys, I really did try to do a video tutorial like I mentioned before, but trying to hold a rolling pin and a £600 camera at the same time as shooting a mini-vid is very hard. Ah well, when I'm rich I'll just have to hire someone to film me :P
I actually traced Peppa straight from the pc screen onto some tracing paper and then used that as a guide for the three parts of the cake, then split those parts in two horizontally to add jam and buttercream. Those three parts were then coated in a crumb coat of buttercream and popped into the fridge for 1/2 an hour. I used white rolled icing to do the first coat of icing, which set overnight. Then I used three shades of icing to create her skin, tiara and dress. Everything else was handmade and stuck on with Sugarcell. (You can't see it very well but I did use white lustre dust on the stars, too.)

I have a massive wishlist of cookery items that I really need to get more professional at these cakes, and one of them I really could have done with for this cake. A Sugarcraft gun would have produced a perfect log shape for creating her darker pink outline on her face, and also the outline of the fairy wings. Unfortunately it's just impossible to create logs that long and symmertrical without them falling to pieces. I hope Jim's got the hint and has bought me one for V. Day :D

More to come soon, Happy Baking! x
P.s What do you guy's think of my make-shift business cards? I'd like to get some properly made up when I have the money and a solid idea - maybe replace the damask picture with my own sketch of a cake/cupcake? (Yes, I'm saying cupcake again. I suppose I'm not going to be very popular if I still refer to the them as buns. Which they are...)

02 February, 2011

Happy ??th Kate!

This is most definitely one for the majority of my followers. Thanks to Abby, I get a load of traffic from fashion and beauty bloggers. Hope you like this one, I'm not going to go into immense detail from now on about my big cake projects - unless I come across a really amazing recipe. The story behind this cake is that it was made for my other half's auntie. She recently hit a big milestone birthday, but she has no idea that anyone other than her own sister knows her true age... So I treated her to a nice cake, and she love love LOVES designers - this cake is very fitting for her :)
However, this particular cake was fairly hard to complete - and included a hysterical breakdown in my kitchen that my mother had to calm down because I broke my new icing syringe on the first use... Drama drama drama. I used some new techniques too, so I'll tell you about them:

- This was the first time I had covered a cake board in sugarpaste icing. Really easy to do, just roll out enough icing to cover your cake board, brush over a titchy bit of water onto the board and transfer your icing onto the board. Cut off any excess from the edge of the board and leave to set OVERNIGHT. Very important you let it set, as the next day when you assemble your cake you won't leave any fingerprint impressions in the icing.
- This was the first time I used edible glitter. The cake shop lady told me you can roll it into the sugarpaste, but I didn't find this very effective, unless you use a massive amount of glitter, which is just a waste. I used Sugarcell for the first time, too. This is effectively a cake glue, which sets like wallpapering paste and you can paint onto cake surfaces and icing - this is how I got the glitter to stick to the icing and how I got the zip and Chanel logo to stick, too.
- This was the first time I got to use my new ribbon cutter tool. At £11 it wasn't cheap for a tiny contraption with different wheels to create even ribbons. There was a serated edge wheel that I used for the stitching effect of the quilted purse. Effective!
This cake isn't perfect, I know. I know it tilts, and you can see the individual layers of sponge through the icing. I think I just got pissed off with it really and just 'made do' in the end. Once I attatched the logo onto the cake, glitter got EVERYWHERE. So it was a case of sprinkling glitter all over the entire piece to make it fit in. Hmm. I think I should have used dowels in the sponge too, since it has no support in it.

I may include some videos soon. I have another Uni assignment this term to do with interactive media. Hmm, food for thought, anyways...

Happy Baking x

26 January, 2011

Chocolate Melt in the Middle Buns

I say buns... I'm sick of the word cupcake. I'm British. And after choosing to do a bloody dissertation on that fricking subject I refuse to refer to fairy cakes as them. Anyone with me on this?
Anywho, ranting aside, Abby and I decided to make some scrumptious buns the other day - chocolate melt in the middle with chocolate buttercream (not frosting ;) ) and sugar decorations. I can't remember the recipe as such, but it doesn't matter - any general chocolate bun mixture will suffice; the only difference you make for the "melt in the middle" part is by adding a square of your favourite chocolate into the middle of the buncases when you've filled them about a 1/3 of the way full.
The recipe we used did advise to eat them straight away, and we did for the image above, and they were extremely yummy! However I waited a few hours before sharing with my other half, and the square of Galaxy I'd used had turned back to a solid :(

Luckily, as an alternative, I know how to make the real melt in the middle puddings. I'd try using a melted chocolate and double cream mixture in the centre of each fairy cake next time - preferably dark chocolate even though I don't like it on it's own - it does add to the flavour.
I've got a cake treat for the majority of my followers in the next post ;) Hopefully it will turn out alright, it's setting at the moment...

Happy Baking x

11 January, 2011

Chocolate Roses

I've recently posted on my Facebook a mass call out to anyone who wants a cake doing, and suprisingly, I've already got another wedding cake to do this year! Ahh!! What's more, it's my friend Jodie's cake - she's a complete chocoholic and so she wants an EXTREMELY chocolatey cake. There is a little shop on our seafront that specialises in chocolate celebration cakes, but to be honest they are totally overpriced and frankly quite rude in there, too. No wonder Jodie came to me!

With this in mind, I had to get a riddle on with getting to grips with cocoform. She doesn't know exactly what she wants, but I best be prepared for whatever she asks for. I dabbled in cocoform for my mum's 50th cake, but mostly that was just rolling it over a cake, with a little white chocolate bow. I need to challenge myself.. So I made chocolate roses today. I got a tiny pink mixing bowl complete with wooden spoon and sponge mix for christmas, and didn't want to waste the sponge mix. I made a few cupcakes with the mix, and decided to decorate with chocolate buttercream and chocolate roses.

To make 7 large chocolate roses, you will need:
- 100g Milk Chocolate Squires Modelling Chocolate. This comes in at around £5 for a pack of 150g - so use wisely!
- Cling film

Method:
1) Knead the cocoform until pliable. The natural cocoa butter will lubricate the paste, so there is NO NEED for Trex or icing sugar.
2) Take off little pieces of cocoform and form into balls a little smaller than Malteasers, but all different sizes.
3) Tear off a piece of cling film, and place a few balls of cocoform onto the film. Pull over one end of the film to cover the balls.
4) Flatten each ball using the palm of your hand, then carefully smooth over two thirds of the petal pieces using the edge of your thumb. This will make it easier to mould the petals to make them look more realistic.
5) Take a small petal and curl it around itself using your thumb and forefinger. This will be the centre of the rose.
6) Gently add more petals to the centre of the rose, attaching them naturally with the cocoa butter in the cocoform. Use bigger petals towards the end of the rose, and curl the edges to make them a little wilted.
7) Cut off the bottom of the rose once finished, you will find that it gets quite fat with every layer of petals you add. I find that 8 petals is the average for every rose.
Please note, that as much as you may love chocolate, cocoform does not taste exactly like your favourite bar of Dairy Milk. It has glucose in the mixture to make it malleable, so it won't be exactly the same, but it's still edible. It's like the chocolate you get in your advent calendar every christmas - it doesn't taste just right, but you still eat it anyway :P

What do you think? Stick to icing flowers or do these look alright for a first-timer? :D
Happy Baking x