21 June, 2012

"I Did it My Way!"


I love Frank Sinatra. I'm jealous of the guy that got this cake.

Very simple design - chocolate fudge cake with chocolate buttercream decorated with a "stage" and my handmade sugarpaste Sinatra and mic. I used my italic letter Tap-it's for the writing, which are now pretty much broken to death. Square and circular cutters were used for the music notes and the checkerboard stage. I won't dwell much on the cake this time. I was really happy with the figure I made, as the only real experience I'd had with sugarpaste figures before this was Fireman Sam and the skiing guy.

The way I make figures is in sections, using Flowerpaste which sets a lot harder and quicker thatn sugarpaste. I roll an oblong piece of paste together, then cut a slit about 75% of the way down for the legs, then I make a torso, and then finally a head and arms. I always skewer the torso to the legs with a small piece of dowel, and insert florists wire into the arms and head to keep them in place, too. I use edible glue to stick on the hands and any facial details. The mic has a long piece of florists wire going through it, so it stays upright.  I used PME Finishing spray over the entire cake and figures to complete the design.

Icing on the Top:
  • The execution of this cake is flawless, in my opinion. Everything is perfectly in order, with the letters spaced out evenly. Using such a contrast with black and white icing I expected a few more difficulties with colour smudges, etc. however this was a pretty clean-cut cake for me :)
  • Frank is so cute. I just wanna eat him. And you can! (Once you remove the wire and dowel, of course!)
  • I had a lovely message from the recipient a few days later saying how good the cake tasted. I love hearing that best of all. At the end of the day, a cake can look fabulous but you're still gonna eat it so you want it to taste as good as it looks!!
Burnt Bits:
  • This picture was taken before I delivered the cake, and unfortunately I made the huge mistake of travelling in a car by myself with a very precariously-balanced handmade figure on top of a delicate cake. He fell over a few times, and I found myself having to turn back home and picking up a small dowel to fix behind Frank to make sure he didn't move :(
Nothing more to report. I've learnt my lesson, and at Christmas I delivered a cake with THREE figures with it - and asssembled it upon arrival, NOT before I travelled with it!

Happy Baking x

Choccywoccymegasuperyummyfabulous


This was my first cake that I've used pillars with, and they're not the traditional plastic pillars you'd usually associate with a tiered cake. This cake was an order for the sort-of-step-sister of an old friend, and she had found a picture of this design online and wanted the same for her wedding. The bottom tier was a chocolate fudge cake with dark chocolate ganache, the middle tier was a vanilla sponge with milk chocolate ganache, and the top tier was a vanilla sponge with white chocolate ganache. All three tiers have their respective flavour chocolate cigarellos surrounding them, which is held in place by the ganache.

The pillars I used were clear fillable acrylic pillars, and they come in a range of tube widths and numbers. From the looks of the picture I was given as a guide to follow, the bride and groom believed the chocolate balls filled in the tubes to be Maltesers, but since I couldn't find dark or white chocolate Maltesers ANYWHERE in the middle of summer (usually you see them at Christmas time) they were happy to let me use rolled-up balls of chocolate Cocoform instead. They were only used as decoration anyway, not to be eaten. Now these pillars were extremely expensive - about £50 from the cheapest places online! - but lo and behold my amazing cake shop owner had these in stock that she lets out to hire, and she let me have the two of them for the weekend for a mere tenner! Score!

I really enjoyed the assembly of this cake, from fixing on the chocolate cigarellos to adding in the chocolate shavings to bring the whole piece together - the entire look really worked well and I was so pleased when it was finally assembled at the wedding venue.

However, I mentioned this was a summer wedding cake. When I arrived at the venue, I was horrified to discover that the cake table had been set up in direct sunlight - and it was a scorching day!! I mean - it's a three tier chocolate wedding cake! And they wanted me to leave it to melt?! You can even see in the picture that it's amazingly bright outside! So after a slightly heated discussion with the wedding co-ordinator, we agreed that the table would be moved into the shade whilst I assembled the cake, and when it was time for the Bride and Groom to come into the Reception room that they'd move the table back where it belonged. I really didn't like this idea. Cakes are extremely fragile, and I had to leave it in the "trusted" hands of the venue staff. So I left the cake in this condition as you see above. But I have no idea what happened later in the day... And unfortunately the B&G were extremely unhappy that by the time they got to the cake that evening it apparantly looked like "the leaning tower of Pisa," as they put it :( Obviously this left my confidence extremely knocked for six, as I knew that I had stacked the cake as carefully as I always would - using dowels and cake boards between each tier to support the weight of the next one. I can only assume that when the staff moved the table with cake later, something jigged and moved...

I suppose this is just one of the punches I have to roll with when working in this business - after delivery the cake is out of my hands and I just have to hope and pray that nothing happens to it.

Icing on the Top:
  • It looks brilliant, I'll even say it myself. I was so pleased with how good it turned out that my mum treated me to lunch as a congratulatory celebration on delivery of my first real wedding cake. So she was witness to everything, by the way!
  • I received LOADS of compliments for this cake from friends and family. It kinda made up for hearing such a critisicm on one of my creations.
Burnt Bits:
  • This is the only cake that I've made to date that the recipient has not been happy with :(
  • Where some of the milk and dark chocolate Cocoform balls touched the white ones they left little smudges of chocolate. I'm a perfectionist, so I HATED those little dirty bits!
  • Chocolate is EXTREMELY difficult to work with in hot weather. When we moved the tiers onto the WHITE table cloth, a few of the chocolate shavings fell onto it and stained it slightly. We were able to fix this by flipping the table cloth over, and when it happened again we used the diamante table decorations to cover them, too.
  • The chocolate cigarellos come in all shapes, all sizes. Some are wider than others, and unfortunately this made them hard to line up next to each other in a uniform straight line. You can see where this hit worst on the bottom tier.
I was on such a high after the delivery of this cake that I can't believe how much that turned around in a few days. I hate this part of the business, disappointing people. I just hope next time that someone requests a chocolate cake that they ensure their cake table isn't in a position that could compromise the final presentation of it :( Something to consider, for all you engaged couples!

Happy Baking x

20 June, 2012

Peace and Love


Remember a while back when I talked about my friend Tash? Her lovely mum was true to her word and contacted me again for another commission for the school!

This time, they were having a very special visit from someone called "The Scary Guy." He's scary because he looks like this:

He's a motivational speaker, and a big deal in America. He goes to schools all over the country to talk about prejudice, racism, respect and having love for others. I think he's great! Now on an international tour of UK schools, too, Tash's mum wanted to provide him and the kids with some delicious treats for his Scary day at her school. This time the order was even bigger - TWO HUNDRED AND FIFTY cupcakes!!! I won't put pictures up of them, as they look exactly like the ones before, and plus I forgot to take pictures of them :D The only difference this time was that I was asked to provide about 25 undecorated cupcakes plus a load of goodies so that the kids could decorate them themselves. Sounds like a fun day of school to me...

She also asked me to come up with a cake for Scary Guy, something to say thankyou for him being there. As you can see, the guy is covered in tats, so I went with a heart-shaped (love) cake and used my ribbon roller cutter to cut strips of icing into 'scrolls' like you'd get in tattoos. The difference being, my scrolls had words of encouragement, like "peace" and "respect." Not "mum" like you'd expect on a biker dude.  

Icing on the Top:
  • He's famous in America - and he ate MY cakes!!
  • It's for a good cause!
  • Everything was super yummy, and I even got a hug from the school advisor that came to pick it all up! :P
Burnt Bits:
  • I still couldn't master the art of royal icing at this point, and my writing was too runny. It spread slightly, which you can see. It's not just a blurry picture.
  • The "scrolls" I made were too thin, which is a problem because I used white icing on top of red and the red shows through :(
  • I couldn't make the original delivery slot due to my old job not telling me about a shift I had that particular day. It was really unprofessional of me to have to cancel, and the order ended up getting picked up at 7am the day of the talk. I know Tash is a friend, so I really don't want it to seem like I was taking the piss. But seriously, I felt awful. Jim's mum, best friend and daughter-in-law all rallied around to help me ice the 250 cupcakes in record time, but thanks to Tash's mum being really lovely and understanding, I didn't need to rush. Thankyou to everyone for just being so amazing to me!
I later found out that the guy devoured most of the cake to himself, and really enjoyed it, so I got a bit of an ego boost there! :D Love for Scary!!

Happy Baking x

09 June, 2012

For an Old Wrench


So you saw in my last post that I was under a bit of pressure as I had that cake PLUS this one to do all in a day - my head was a bit fried by the end of the weekend as I ended up going to both parties, too!

I love this cake, it was such a talking point at the party! I delivered it to Jim's mum before we headed out to an engagement party, but the cake box was sellotaped down so I could give the cake the big reveal to her when we came out later in the evening.

For christmas my darling bestie, Abby, gave me a rude cake book. One of the cakes is a builder's bum, and I showed the book to Jim's mum later - she loved the builder's bum and made a joke about having a plumber's bum cake for her birthday and then left it. Of course, I took note on what she said and when it came to her birthday I made sure I was the one to be making her cake as I had a suprise for her. You see, she's training to be a plumber, and she's bloody brilliant at it!

So I made the necessary changes to this cake to make sure everyone knew it was a female bum by adding in the frilly thong and sparkly (although you can't see it) plumber's tools. I used my ribbon cutter tool with the serrated edge to give the stitching effect on the jeans and plumber's belt, and dabbed edible lustre dust in Terracotta on the bum to give the "dirty" effect. I marbled brown and white icing to give the effect of a dirty rag and tucked it into the jeans pocket, too.

Icing on the Top:
  •  Jim's mum, Tanya, was over the moon with her cake, and couldn't stop showing her guests. Always a good point :)
  • I'm really pleased with how much detail I gave the bum. Having a rather nice one myself, I pride myself on the detail in that area. Haha!
  • Another successful Pyrex bowl cake!
Burnt Bits:
  • I made this chocolate cake about a week in advance because I knew how busy I'd be with the engagement cake, too. I then froze the cake, which I've read a lot about. It didn't taste bad - it was nice - but fresher is always better.
Still to this day, Tanya raves about her cake :)

Happy Baking x


08 June, 2012

For Better or For Worse...?


Quite possibly one of the worst cakes I've made.

Alright, I know it's not terrible. But it ain't great. People can say all they like that it was a great cake, but I know deep down they're thinking... WTF?!

This was for one of my best friend's engagement party. She is one of the sweetest people you will ever meet, and I feel so terrible for the way this cake came out. On their first wedding anniversary I plan to replicate this cake the way it should have been made so fear not! Hannah and Mark will get their perfect engagement cake one day! It should be noted that I'll also be making their wedding cake so I'll be sure to make that one perfect too!!

Icing on the Top:
  • This was a replica of their proposal, which I cried at when Hannah told me (not because she had a diamond ring, because I'm genuinely happy for her!!). Haha, no being serious. It was Hannah's 21st birthday at Glastonbury 2011 and Mark took her up on Glasto Tor and after much fumbling about in his pocket for the ring that his mum had SEWN to the inside of his trousers, he managed to pop the question to our beautiful Hannah. So Hannah and I agreed on this design for their cake.
  • The reason I don't like this cake is because there's too many inside layers of cake. Don't get me wrong though, you can argue that having too much cake is a pro, so I will argue that.
  • Hannah and Mark really are just the sweetest couple and couldn't stop gushing about it. I even got a mention in the toasts, so I'm guessing they liked it.
Burnt Bits:
  • It's shit.
  • Normally, I bake two layers of cake and sandwich them together with buttercream. For some reason I was convinced that these layers wouldn't add enough height to the cake so I carried on baking and gave them a triple-layer cake on each tier. Unfortunately, this didn't work in my favour due to the amount of buttercream I sandwiched between each layer, and this led to it spilling out of the sides of the cake once I covered the cake in icing. The weight of the icing just helped push out even more buttercream, and gave this horribly bumpy edge to each tier.
  • I thought that by adding a string of trees around the tiers it would help disguise this. It didn't, and I don't even think there are many trees at Glastonbury festival.
  • I was under a lot of pressure to make this cake. I had stupidly agreed to also make my then mother-in-law's birthday cake for the same day, and suffice it to say, I put more effort into her cake :(
  • I couldn't get the consistency of the royal icing right when I was finishing off the bottom of the tiers, and a lot of it melted into one another instead of maintaining their 'star' shapes.
  • The 'Glastonbury' sign was supposed to be made out of flowerpaste, so that it would harden and I would be able to stand the letters up on the side of the tiers. I didn't plan this very well, and the letters I was cutting out were very wonky, messy, crappy... So I just printed off a picture of the sign and cut it out, layering the letters onto card and affixing them to the cake with cocktail sticks stuck to the back of the letters.
  • Hannah and Mark are HUGE compared to the sign. Evidently not good to make out that they are in fact, giants.
I will now post about the other cake I made that day to make myself feel better about my cake-making skills. Boo me!

Happy Baking x

07 June, 2012

This Cake Has Been Left Blank For You To Write Your Own Message

Sorry, it's a boring one guys!


It's nice that once in while someone asks for a simple cake - just something with a personal message on it. These cakes were both given as gifts and I was instructed for both of them to just have something simple on there.

I really don't have an awful lot to say about either of them, both recipients were pleased with them - but I know in my heart of hearts they could have been just a bit better... And I'd promised to show you everything I've done. Lucky you!

Icing on the Top:
  • It was good practice despite a simple design for each of them. One was a 6" vanilla sponge cake and the other was a 8" fruit cake. It's not often I make small cakes and they're a right royal pain in the ass to cover in icing as you don't have a lot of control over them like you would larger cakes. Also, I don't make too many fruit cakes unless someone wants one in one of the tiers of a wedding cake, or if it's christmas.
  • When the fruit cake was baking it made my flat smell like christmas in Summer :)

Burnt Bits:
  • I hadn't done an awful lot of piping work before the pink cake - that's something I know I need to improve on and the next time I cover a cake dummy I think I'll try some intricate icing designs. You can tell that my font sizing is all over the place on this one and if I had just taken the time to plan ahead and space out my letters then it could have been really lovely. Luckily, it's a funny message so I think it looks okay a bit skew-whiff!
  • Remember what I said a few posts ago about how if you use too much Finishing Spray on a white cake it gives it a yellowy finish? Exhibit A: The Yellowy/White cake.
It'll be more interesting next time, I swear!

Happy Baking x

06 June, 2012

Cake Baby


I had a lot of fun on this baby! (Haha, pun intended!)

Now my dear friend, Jodie, had a most unusual request for this cake. It was for her best friend's baby shower, and she wanted something... A little unusual. She had seen pictures of "funny" baby shower cakes, and wanted one like that as you always see the same baby pink/baby blue teddy-bear infested pile of vom. However, these weren't "funny" cakes - they were downright horrid! (Picture this cake, with a hand sticking out of the belly holding a sign saying "Nearly there!" Um, no. Just no.)

I managed to convince her to go a little more conservative, and at most I allowed the inclusion of painted-on stretch marks at the bottom of her tummy. I did add some on her boobs, too - but they just looked like stink marks you put on a cartoon. So I promptly removed them with the aid of vodka and a cotton bud :)

Icing on the Cake:
  • The shape of the cake was created by baking the boobs and tummy separately in glass Pyrex bowls. I know you can get dome-shaped cake tins, but when I went to hire them from my usual place, someone already had them. It was the cake shop owner's idea to bake the cakes in bowls - and when I asked if that was safe to do she reminded me that we bake everyday in glass (casseroles, lasagnes etc. Duh!). I greased the bowls first in Cake Release Spray and filled each bowl to about 2cm below the rim to allow for the cakes to rise. I always bake any cake for 15 minutes uncovered first, to get a lovely golden glow across the top. Then I cover the cakes in tin foil and I baked for another 40ish minutes (depending on the size of your bowl this will vary cooking times. Remember your bowls are DEEP and you want them cooked right through!!!
  • I got loads of compliments just on the basis of the babydoll design. Obviously a hit! I love creating sugarpaste bows so I had to include one on there somewhere!
  • This was lemon drizzle cake. 'Nuff said. Mmmmmm.
Burnt Bits:
  • As previously stated, the bowls I baked these in are very deep, which is annoying as you don't want to keep removing the cakes from the oven too many times to check if they're done. Always check them with a skewer. When you come to half the cakes to spread a filling inside you'll soon find out if you took them out too early (which I've done!).
  • I don't like the quality of the picture. I used the PME Clear Finishing Spray again on this one but it just looks wet.
  • This cake was huge. I used a 14" x 16" cake board just to give you an idea of the size. It was only meant to feed about 20 ladies so I'm assuming there was lots left over. No biggie though - better to be bigger than too small.
  • The hands. Jodie wanted them on there. I don't like them. That's all.
On a final note, I want to give a special mention to Jodie's adorable 2 year-old, Fliss. Upon Jodie turning her back on the cake, Fliss proceeded to push her toy box up against the table the cake was on, climb up on said box and promptly POKED the cake in curiosity. Needless to say I had frantic messages from Jodie asking what to do to salvage the cake, but by the time I realised what had happened she had managed to sort it out! Her daughter really is adorable though, so I'll let her off :P

Happy Baking x

28 May, 2012

"I'm legit, bitch!"


I apologise for my rude title, family members :D I've recently got into Michael Patrick King's HILARIOUS new comedy '2 Broke Girl$' (in which, coincidently, the main characters are trying to build a cupcake business. Huh, go figure.) and Max receives her first cheque for a legitimate cupcake gig and screams this out to her diner patrons. Well this was my first legit gig!


One of my brilliant friends, Tash, recommended me to her mum (the headmistress of one of Plymouth's secondary schools) when she needed someone to make a cake and cupcakes for a staff event at the school. A cupcake shop in town - which will remain anonymous, but if you live in the Muff then there's only one - charge £1.50 for theirs, and my going rate is two-thirds of that. So Tash's mum came to me and asked to create a sandwich cake to raffle off (I think, it was a long time ago now) and the cupcakes were for the staff. She just told me to decorate them colourful and sparkly!

I love the sandwich cake, it was so fun creating all the fillings and it genuinely looks so edible! Hehe! I just baked two 8" square vanilla sponges and halved each of them, then covered them in white icing. I made cheese slices and poked holes through to make it look like cartoon cheese (seriously, can you actually buy cheese with holes in?), cut out round circles for tomatoes (not too much detail on the slices as I knew these would be well hidden underneath the "bread") and then streaked different shades of pink and green icing to make bacon and lettuce, respectively. I painted on bread "crusts" with brown food colouring, and dented the top of the "bread" with my knuckles to make it look loafy.

Icing on the Top:
  • I was later told that the winner of the sandwich was thrilled with her prize, which makes me happy :)
  • The loafy effect of the bread was an accident. I dented the top of the cake when I was painting on the crust by leaning my hand on the cake (not the first time I've done this, oops!) but actually it was like a happy accident, much like discovering penicillin, or my brother! Haha.
  • I had so much fun decorating the cupcakes with a range of sweets - Smarties, Magic Stars, marshmallows, sparkly sprinkles, Malteasers, etc...
  • I bought a new HUUUUUGE icing bag to decorate the cupcakes with - allowing me to ice around 25 cupcakes without stopping to refil my bag with buttercream. £8 well spent!
  • I thought the picnic-blanket effect for the cake board was very effective :) And whaddyaknow, I used my sugarcraft gun to create the long strips of blue icing!
Burnt Bits:
  • I made the cupcakes the night before they were due to go out, and the next morning found that the colouring from a lot of the Smarties had ran into the buttercream due to the moisture :(
  • The "crust" I painted on the cake ran slightly onto the cake board design. I tried my best to clear it up with vodka, but I risked ruining the check blanket effect the harder I tried. Sucky.
Needless to say, my friend's mum was super-pleased with the results, and agreed that if she ever needed me again she would be sure to call. And two weeks later she did! My first cheque from the CITY COUNCIL arrived soon after this order as it was technically a school expense. WAHOOOOO!!!

And so began my short-lived journey to official self-employment.

Happy Baking x

27 May, 2012

Cup for 'Cap


For some absurd reason, Photobucket has decided it does not want to watermark my photo.  I'm not about to go about galavanting trying to work out how to use a new photo editing programme, so I've just uploaded it as it is. If you wanna steal it, go ahead. Make my day.

This was the first time I got to use my silicone giant cupcake mould. And I did not like it. I hate the feel of silicone. For this reason, I will never get fake boobies. Aside from that, it never feels clean - always greasy. And this particular mould had many nooks and crannys that were just ridiculous to grease beforehand, so I used Dr Oetker Cake Release Spray. I do tend to use this from time to time, if I'm in a lazy mood and don't want to line a tin. It works wonders on mini cake pans, too. More on that later, though. Also, lining a tin helps give your sponge some protection from the heat, so it's always good to use greaseproof paper in your tins. But like I say, it really wasn't feasable in this cake. So good old me, I pour in my vanilla sponge mix to about 2cm below the top of the mould. This allowed for the cake to rise as necessary, but still be able to level it off to a standard worthy of cupcake proportions. I covered the moulds (incase you haven't seen them, they come in two halves - the 'case' and the 'swirl.') in tin foil and baked until a skewer came out clean. I think this was about 45 minutes - 1 hour. Bear in mind that these moulds are DEEP so you want to ensure your sponge is THOROGHLY cooked through.

I haven't even told you this cake's history yet. I used to work in a retail concession within a food store (weird, I know. I think we were the only one in the country.) and word was soon spreading among the supermarket staff that I could make cakes. I was approached by the duty manager one day who asked if I'd like to donate a cake that they could raffle off for Mencap, which is that store's chosen charity to raise money for each year. I always liked getting stuck into charity gigs at work, whether it's fancy dress, hula-hooping (yup) or - you guessed it - baking cupcakes. (Buns.) So, of course I obliged. Now I know everyone is super crazy about cupcakes so I chose this design, plus I wanted to use the mould that my friend Jodie had so generously given me after she attempted a diabolical version for her daughter's first birthday. Needless to say, I did her second birthday cake :)

I really didn't like how this cake turned out. Even a co-worker said it wasn't my best work. Wow, that was like a smack to the face, but I knew it was true. I haphazardly covered the 'case' half of the cake in white icing, prettied it up with a bow, then covered the topping half with store-bought (slap to the wrist) chocolate fudge buttercream. I applied it with a flat-bladed knife, as I knew that if I tried to pipe it on exactly as you would a real cupcake in a swirl, it would just look like a massive poo. Sorry to be so blunt!

Icing on the Cake:
  • For design purposes, it is aesthetically pleasing. Smarties works well for 'sprinkles,' and if I went too far with the decorations it would have looked rubbish and OTT.
  • It was for charity. I earned no money on this cake, and was told later that about a half a booklet of raffle tickets were sold from people wanting to win the cake. You know how thick those books come, so I'm pleased.
  • The guy that won it was on a diet, he just wanted to donate some money somehow so bought a ticket. The entire supermarket staff got to devour the cake in the staff canteen later. Win!
Burnt Bits:
  • It wasn't my best work, and I'll put my hands up to that. I can see a little dent underneath the "swirl" and I have no idea how it got there.
  • I was in such a rush that I smeared chocolate buttercream on the 'case' slightly. You can't see it, but I know it's there. I just wiped it off with kitchen roll, but if I took my time I know I could have gone to work on it with a clean piece and some vodka, bringing the white icing back to it's brilliance again.
  • The silicone mould is horrible. I DO NOT recommend it. The edges of the cake felt slightly crispy from where the sponge pretty much "fried" against the cake release spray. I'm not really sure how that ended up tasting but I did smother the thing in buttercream before covering in icing so I'm hoping that it wasn't too bad. I hope :(
  • Again, if I took my time over it, I could have really gone to town on the 'case.' I saw a technique on Ace of Cakes once, where they made an oyster cake. To get the ridges of the shell, they covered the sponge in the first layer of icing, like normal, then used a sugarcraft gun (godsend) to pipe long tubes of icing at intervals across the shell. They then covered it in the second layer of icing, and lo and behold - there were the little ridges across the shell! I could have SO done this on the cupcake wrapper to give that ridge effect. Maybe next time :(
At the end of the day, I know this cake wasn't my best work. I'm not saying it was my worst, either. You've seen my worst. But it was for charity, so it ultimately has a happy ending :)

Happy Baking x

07 May, 2012

Zoom Zoom!


This chocolate fudge cake was a nightmare. You'd have thought the initial shape of the cake and design looks relatively easy, but my god, how I got to the end of this cake I'll never know. Especially because I rolled home from a night out at 3am, awoke at 6am, made this cake and delivered it by 10am. Yeah, that's how I roll... (And this was one of two cakes I delivered at 10am... Booyah!!! Coming next post haha!)

When I made this cake it was the first time I'd ever attempted to use one of those number-shaped cake pans. They're weird, and have no bottoms. God knows why. So the pan I used looked like this:

I asked the ever-trustworthy (?) lady who owns the cake shop I frequent for advice on what the hell to do with it, since I hired it from her for the meagre price of £1.75 for 3 days. She's very reasonable when it comes to her prices, I'll give her that. Sometimes she gives me ribbon or a small cake board for free because she knows what a good customer I am :) Anywho, she recommended covering the TOP of the pan in tin foil, and sellotaping it to the tin. Apparantly it works a charm every time. Well, I couldn't get the damn tape to stick, so I just wrapped the foil up the edges of the tin and put it on another baking tray. Now I say you cover the TOP of the tin in foil. Why - may you ask? Because us cake-makers know that when you turn a cake out, you always ice the BOTTOM of the cake, as that has the smoothest surface. So turn out your cake, level off the top, but of course you still get that crumbly, juuuuust slightly imperfect surface. So flip it, ice it, and BAM!

Right, so on we go. I fill the pan with the cake mixture, and bake away. Of course, so my horror upon opening the oven later on, the mixture has spilled up and over the top, out of the edges - it's everywhere really. The cake wasn't level all the way through, it was just a disaster. So obviously my time and patience are wearing thin, and I decided to level it off as best I could and set about covering it in icing. That always adds a bit of bulk to a cake anyway, so I knew it would be okay once I got the ball rolling. Which it did! That checkerboard ribbon I picked up was fabulous for this cake! I was well impressed with it. Look at that, my janner voice is coming out even as I type. "Well impressed." I'm reminded somewhat of my Auntie Anne, but that's going off track... Ahem :P Get it...?


Icing on the Top:
  •  Bearing in mind my minimal time window (self-inflicted, I know. But this is what I'm talking about when it comes to making the decision to collapse the business. It was either have a social life and save my sanity, or make cakes.) I was really pleased with how the car came out! Yeah, he could have had a little more detail on him. But for a piece of decoration that was going to come off the cake five minutes after everyone "ooh"ed and "ahh"ed at it, it was pointless. Plus, the recipient was two years old. He knew what it was and was squeeling "Lightning Mcqueen!!" at the sight of the cake. Oh, how I aim to please.
  • My skill level whilst still slightly drunk. Not too shabby.
Burnt Bits:
  •  Although you can't see it, the top left corner of the cake was considerably smashed to bits :( The consistency of the chocolate fudge cake I used to make - albeit absolutely gorgeous tasting - was just too crumbly to be used for cake making. I now buy my chocolate cake mix ready made. Not the Betty Crocker rubbish from supermarkets, but from my cake shop that the owner mixes up herself. It saves so much time melting chocolate, adding in foreign ingredients like sour cream etc, and is just so much cheaper. I know I sound like the devil even as I type, but I made hardly any profit when I had the business. A sponge mix that costs £3.75 versus making it from scratch for over a tenner is going to win anyday.) Wow, that was a long bit in brackets. Anywho, so the smashed bit had to make up its shape in chocolate buttercream and was then well-disguised with the icing. I think that was the last time I used that recipe.
  • I should have practiced with the cake pan before making the cake. I would have saved so much hassle and actual cake that it would have turned out a lot deeper, but alas it was not to be.
So, this cake has a few hidden flaws. From the outside persective you wouldn't have thought it, which is hard for me to say because obviously I like my cakes to be good on the inside as well as the outside. Many people mistake that about the high-flying cake makers of the world. They gasp in shock at these masterful creations, but at the end of the day does it all really matter unless the taste good? I love Ace of Cakes and Cake Boss, but once you take away the structure of the cakes, and all the interior light shows and smoke machines, how much of it is actually edible? Suffice it to say, all of my Number 2 Lightning McQueen cake WAS. And it tasted prettty damn good :)

Sorry - I ranted for much of this post. It seems I have a lot to say lately. My texts are like essays, and my diary will need to be replaced soon. I have too much time now.

Happy Baking x

05 May, 2012

Full Steam Ahead!

So in this post I've decided to include two cakes I've made. The reason being for this that I wanted to go right back to the beginning and blog about all the cakes I missed, and talk about what I liked, where I went wrong, etc. But the next cake that was on my list was a super easy cake, and in my personal opinion I couldn't have done it any better - even if I do say so myself! You may think I'm being big-headed, or you might look at it and think it's crap - but I really do try and find flaws with every cake I've made, and this one I couldn't. So I'm pleased with how it came out, and I'm proud of me. I'm allowed to be sometimes :)

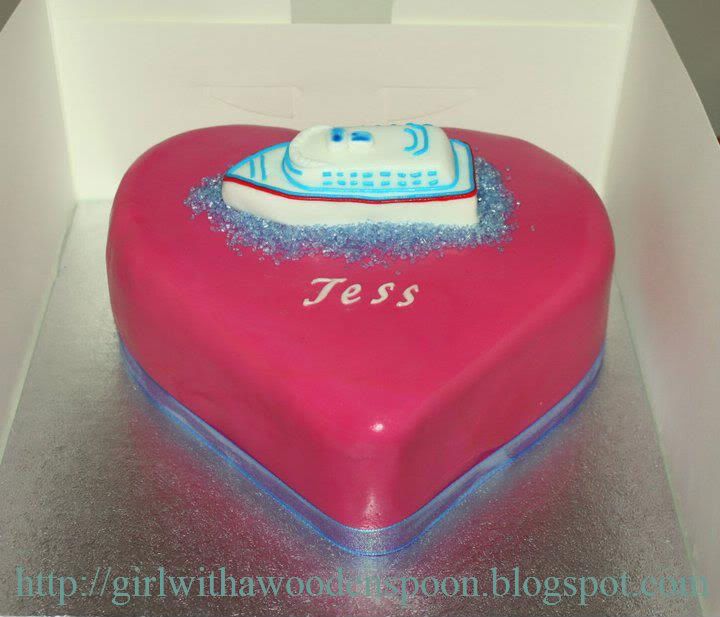
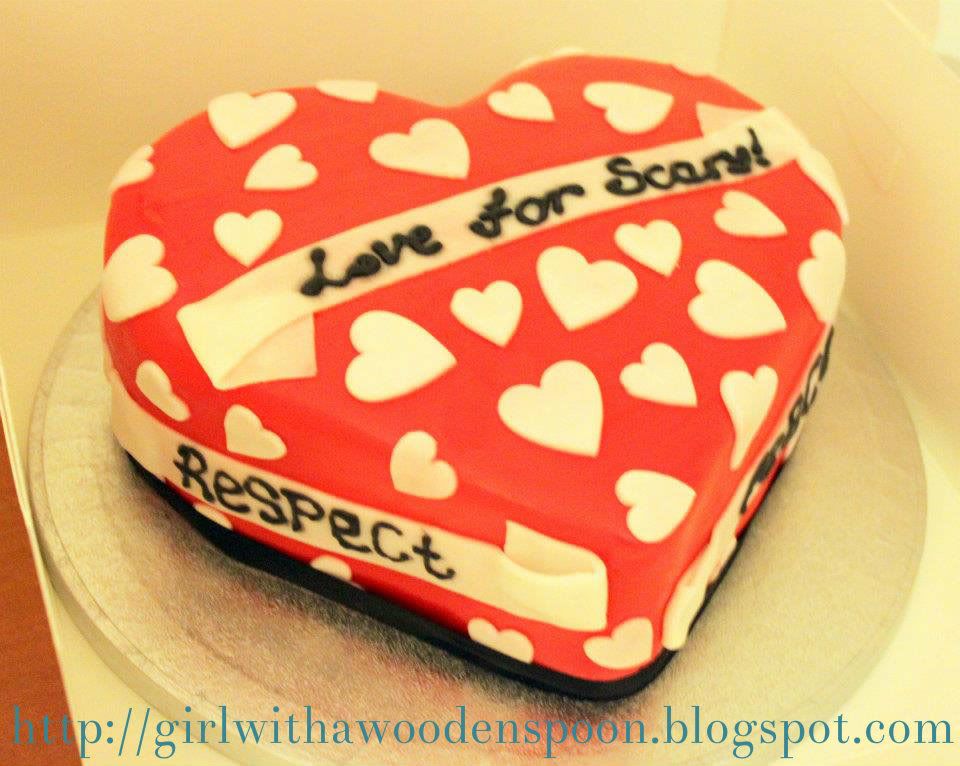
This was a chocolate fudge cake that was ordered due to a recommendation from another client - apparantly her mother-in-law couldn't get enough of her cake (it was the purple butterfly cake from a previous post!) and decided to order this one for her friend who was leaving for a cruise. Simple - she wanted a pink heart cake, with her name on it, and a sugarpaste cruise ship. Which I delivered to the best of my ability and I love the simplicity of it! The ship was relatively easy to mould out of icing, and I added the blue and red detail on it using my sugarcraft gun and the pinhole disc. I really do love that thing. I placed it onto a bed of blue sprinkles for the sea, which I think gave it a really sparkly and girly touch. I finished the cake off with PME Clear Finishing Spray, which I recommend completely but you do have to use it sparingly as it can give a horrible yellow finish to pale-coloured cakes (thus ruining some of my future cakes :( ).


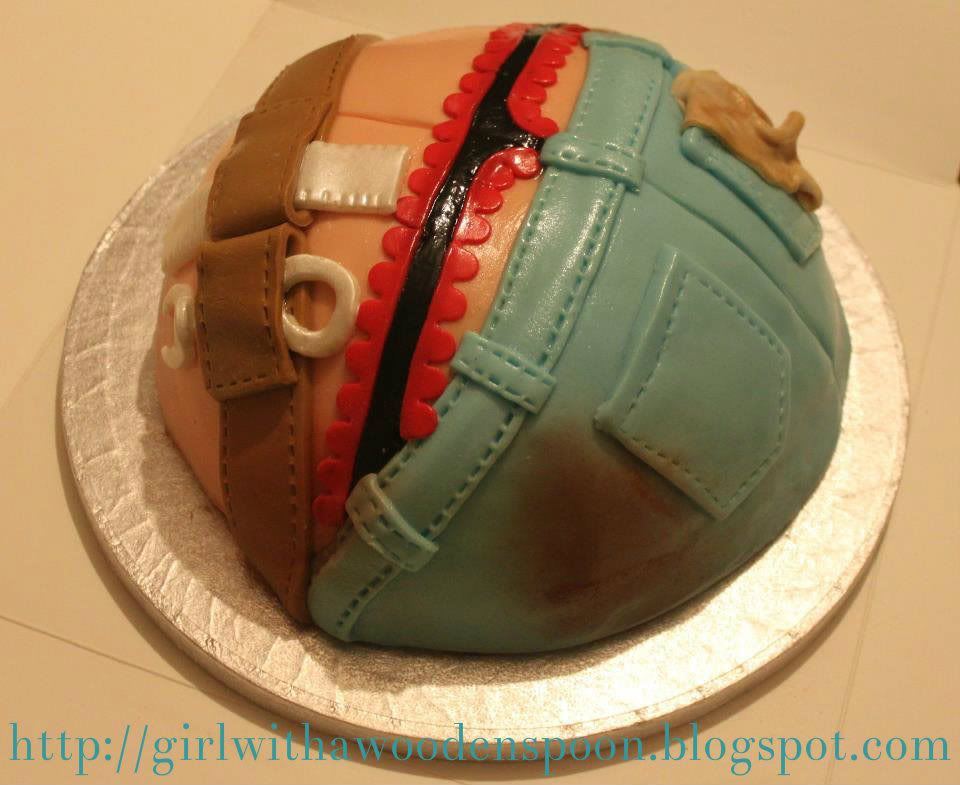
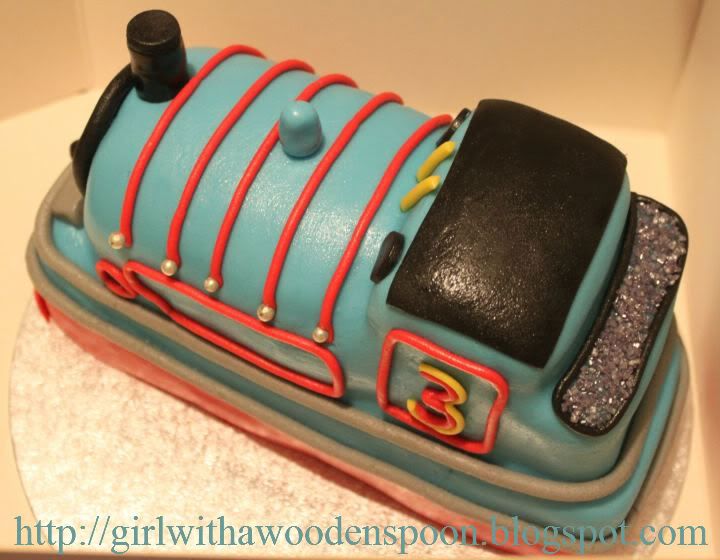
This was one of my favourite cakes I've created. It was for my adorable second cousin, Rhys, who is Thomas the Tank craaaaazy. To this day I have no idea how I managed to mould the actual train shape together using chuns of cake, but I think I did a pretty good job considering! Now I will tell you a secret though, I cheated. :O I actually bought a jam and vanilla buttercream roly-poly cake from Asda to get the tubey shape of his body. I know, I'm going to hell. It was in their basics range, too. :O again!

The rest of the vanilla cake I baked in a loaf tin, just like I did when I made my Fireman Sam cake. I then cut him down to size, took a bit from here and there and - voila! One TtTE cake at your disposal! I primarily covered him all in the lovely blue icing, then added in all the extra detail using a selection of tools like my sugarcraft gun (agaaaaiin), my ribbon cutter and just my general awesome hands. Haha. P.s, I've used the number '3' on the side of the cake as it was his 3rd birthday, not because I'm a complete retard and don't know that Thomas is actually engine number 1. Duuuh.

Icing on the Top:
  • Using simple supermarket home-baking decorations like silver dragees and coloured sprinkles to add to the detail really tipped the whole design off.
  • Every single section of the cake was edible, which is a huge thing considering how much detail is on there :)
  • He just looks so happy.
Burnt Bits:
  • The cheating part. Naughty Kirsten.
  • He doesn't have any wheels. I don't know why. I think I realised this just as I was boxing him up, but just thought "eh, never mind, there's no track anywho."
  • There's no track. I could have really gone to town on the overall finish by covering the cake board in icing and making up a track and all sorts. But I didn't, because I just couldn't be bothered.
  • He isn't completely to scale, which is very noticeable. I didn't realise this until I was adding in the silver tubing around the edge of the train, when it starts off quite low on one side, but a lot higher on the other. My bad.

Again, I finished off this cake with the PME Clear Finishing Spray. I like to use it on cakes that have a lot of detail on it, as I make all the detail parts separately and then add them on right at the end. This means that I usually use a separate workspace doused in icing sugar to dry the pieces out, but of course the pieces also get covered in a fine layer of icing sugar - which ain't a good look. The finishing spray disolves the icing sugar, giving the cake the pristine look that I always love at the end of a good cake. But as mentioned, use it sparingly on lighter cakes, and if you do have to use a lot to get rid of any excess icing sugar then maybe think next time how you can eliminate as much of it before transferring it to the cake. I use a blusher brush for big pieces of detail (never used with blush, of course. It has only ever been used for cake purposes, I assure you!!) Also, another good tip is to cover as much of the surrounding surfaces and cake board as possible, preferably with kitchen roll. If the spray gets onto any surfaces like your table tops or turn-tables, it is a BITCH to wash off. It is almost like a permanent edible glue. Not nice. And if it gets onto your cake board, wipe it off immediately with a piece of damp kitchen roll. If you let it dry out and then try and wipe it off, you'll ruin the cake board.

At the end of the day, I created two pretty damn good cakes. Both recipients were extremely pleased (Rhys especially!) and I was very happy with them :) Go me!

Happy Baking x

29 April, 2012

On The Piste


Ahh, we're back to one of the first cakes I ever made! But I said I'd discuss each cake, including the ones I really buggered up. This one, I did just that! So I've made up my own version of 'pros and cons' that I can look back on and review!

Here's what happened: One of my best friends, Hannah, was going away skiing with her boyfriend and his family and while they were out there it was her beau's 21st birthday... So she asked me to make a cake for him and yes - she took it all the way to the Alps (or wherever it was, I can't remember now!) She definitely crossed country borders, though. Cool huh? My cake went international!

Trying to remember now, I believe this was a vanilla sponge cake with jam and vanilla buttercream filling. The design was Hannah's idea, and to be honest I was pretty pleased with my first attempt at creating a sugarcraft person!

Icing on the Top:

  • The base of the cake was relatively perfect, a gorgeous icy blue colour with cut-out snowflakes and trees lining the sides.
  • It was the first go at using rolled-up balls of icing to also line the sides. This just tidied everything up a bit and also looked like snowballs!
  • The ski man was really cute and entirely edible! I created him by shaping an oblong piece of blue icing into arms and legs and a body, then adding on the head and additional pieces of clothing.
Burnt Bits:

  • I should've used royal icing for the snow splat on my little ski man. Instead, I used glace icing and it just wasn't the right consistency - it was too runny and absorbed all of the icing sugar 'snow' I sprinkled over him.
  • I really should've thought about what I wanted for the personalised message. This cake was actually presented on a silver cake board and 'Birthday' was stencilled onto the board rather than the cake as you can see I ran out of space! Looking back, I could have just stencilled out his name - 'Mark' - which would have fitted perfectly... Arrghh!
  • Unfortunately, Hannah and Mark's mum wanted to transport the cake discreetly and the big cake box it came in was just too recognisable amongst their ski gear in the boot of their car. So they removed the cake from the board (ahhhh!!) and popped it in their own tupperware box, and only managed to salvage a handful of the snowballs that were stuck to the board.
  • Finally, when using the shoddy alphabet stencils (they're called Tap-it's - don't use them!!!) I bought (I'm on my third set of them, they're not cheap either, but when you 'tap' them, not only do your letters pop out, but half of the stencil does, too. I use silicone ones now that you can tease out and they're soooo much better) they get covered a bit in icing sugar from where you've rolled them out. To get rid of the icing sugar blemishes on the letters, I used edible glue rather than a dab of water, and not only did the 'snow' sprinkles again get absorbed by the glue, but it never dried and gave a blotchy, wet look to the letters.
You can imagine by the time Mark got his cake he was probably looking at it a bit oddly. Of course, it's not Hannah's fault that she had to move the cake from it's original location but the end result was a bit naff thanks to my mistakes. Also, when I delivered the cake I realised that I hadn't remembered to put my memory card in my camera so didn't have any pictures of what it looked like as I left it. These are Hannah's pictures which she kindly sent me!

Sorry Mark, hope you had a good birthday. You were skiing afterall...!

Happy Baking x

You Live for the Fight When That's All That You've Got

Hi y'all...

I know, I know. August was the last time I posted on here. But I'm back. I've recently gone through the most devastating and painful few weeks of my life and I need somewhere to direct my (sad lack of) energy. You might remember me going on and on about the fact that I was moving out of my parents' home and into my own little flat - well, I'm back home now. So I'm sure you can make your own guesses of what's happened, but I really don't want to divulge the dirty secrets - that's what my personal diary is for. And my god, you do NOT want to read that. (It's like that bit off Bridesmaids, where Brynn reads Annie's diary... "At first I did not know that it was your diary, I thought it was a very sad handwritten book.") Haha, at least that made me laugh!

So with the title of this blog post in mind, my HUGELY supportive network of family and friends have all told me to keep busy, keep my mind off things, keep off Facebook! It causes more trouble than harm, seriously. I would know! So I've deleted my account, and I'm like "hmm... What do I do on the internet now?" Looooads of people were against me deleting my FB account, but I can turn pretty bunny-boiler stalker on there, so it's for my own good. But said people were also wondering how they could keep up with the progress of my cakes? Ah yes, my go-to hobby. Not a business anymore, a hobby.  It just got Way. Too. Much. Trying to change jobs, trying to maintain a household, trying to hold my relationship together. I can't do it all, I'm only human. The week before christmas I had SIX cakes to do. SIX!! I literally worked myself to the bone, I was tired, I hadn't read a good book in ages, and I had no social life. Things needed to change, so I collapsed the business and any legalities that went with it. Phew.
I'm fighting my damn well hardest. I really am. My parents probably don't think so, I've had about 3 nervous break downs/panic attacks in the last month alone - and I've never had one in my life! Sure, things have got low. No - they hit rock bottom. But I have a reason to get out of bed in the mornings. I have my friends, my family, my work, my hobby, my adorable cats (best bit about being home!). I sometimes feel like there isn't a point, but then I have to stop and think about alllllll the other people who have got it so much worse than I do.

With this in mind, I will take Mr Jovi's advice and fight to get my life back on track. I always liked those lyrics. I went through a phase a while back of wanting special song lyrics tattooed somewhere on my body - but I could never get the right ones. But these were always the front-runner, yet back then I feel like I had nothing to fight for? Things were going amazingly in my life, and these were quite depressing lyrics - knowing that you can't just wallow in self-pity and that life and happiness IS worth fighting for. I already had happiness. Had, being the important word there.

So I'm back to blogging! I really let myself go on the blogging front, just posting pictures of the latest cakes by the end of it. You all seemed much more interested when I showed you my progress pictures, shared recipes and cake-making secrets. I suppose I kinda stopped all that because I was worried about people stealing my ideas, but they did that anyway so nevermind! I'm going to go right back to where I left off, and share my thoughts and ideas with you all. I'm not fussed if I get more followers, or if people comment on the posts, but at the end of the day I just need something to take my mind off things and direct my thoughts somewhere other than my sad little diary :) (Or Facebook, for that matter!)

The Original Girl With a Wooden Spoon x