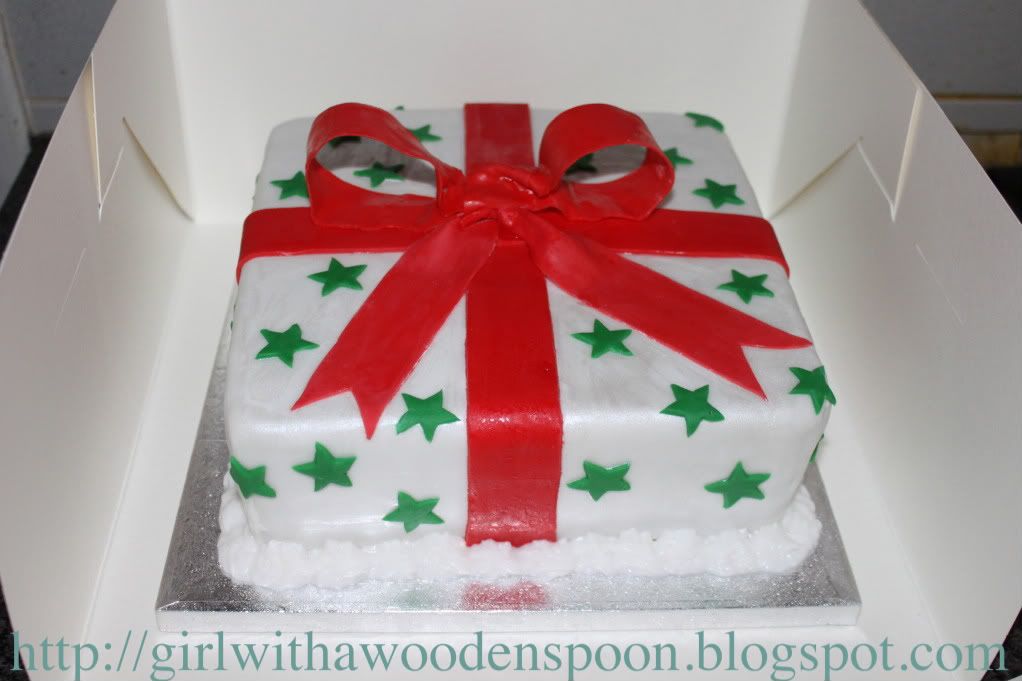
My christmas cake is finally finished! I say finally, because I started making it back in November. That's the beauty of fruit cakes. I'm sure you already know this, but, like wine, they keep better the longer you have them. That's why the top tier of a wedding cake is traditionally fruit so the newlyweds can keep it and re-ice it for their first child's christening.
Anyway, I'm rather skint this festive period. So what better present than a home-made christmas cake?! The lucky recipient is my boyfriend's Grandad, who they lovingly call "Grumpy." He was supposed to visit relatives in Ipswich this christmas, but due to all the snow and whatnot, he's staying in Plymouth. Shame really, seeing as he could've shared the cake with everyone up there!
Would you like to know how to make it? Okay, you'll need:
- 12oz Self-Raising Flour
- 1/2 tsp Salt
- 1 dsp (dessert spoon) mixed spice (I used Christmas Spice, available from all supermarkets)
- 1 tsp cinnamon
- 1 tsp nutmeg
- A lot of fruit. I didn't measure my quantities. I'm quite bad for that. But the recipe I followed recommends 1lb per fruit i.e. ground almonds, currants, glace cherries, mixed peel (lemon and orange), raisins and sultanas.
- Rind and juice of 1 lemon
- 12oz Butter
- 10oz Dark Brown Sugar
- 8 Eggs
- 8 tbsp Brandy
1) Butter a deep cake pan. I used a square 10in pan. Line with greaseproof paper. Brush the paper with melted butter.
2) Tie a double layer of brown wrapping paper around the OUTSIDE of the cake tin, and make sure it's high enough to protrude above the rim. I don't know how, but it prevents the fruit cake from burning.
3) Sift all dry ingredients together. Stir in your fruits.
4) In a separate bowl, cream the butter, sugar and lemon rind.
5) Beat in the eggs, one at a time.
5) Stir in the flour and the lemon juice, and 4 tbsps of brandy to this mixture.
6) Add this to the dry mixture and stir thoroghly. Transfer to cake tin and level out.
7) Bake on 150'C for an hour and a half.
8) Reduce the heat to 130'C and bake for a further 3-3 and a half hours. Cover the cake with brown paper and fasten with string in the last few hours to prevent burning.
9) Remove from the oven and cool on a wire rack. Turn the cake upsidedown and skewer holes in the cake. Pour in the remaining brandy and seal in an air-tight container until needed for icing.
To Decorate:
- Marzipan
- White Sugarpaste
- Green Sugarpaste
- Red Sugarpaste
- Neutral-coloured Flower Paste
- White Shimmer Powder (Only available from cake decorating stockists i.e. Lawson Shop.
- Trex vegetable fat
- Marmalade
Okay, Trex is AMAZING for cake decoration. If you haven't already discovered it, it's a great, greasy alternative to a tonne of icing sugar when rolling icing and marzipan. It doesn't dry them out, and it's so malleable. All you have to do is rub a bit between your (washed) hands, on your rolling pin and the work surface. Roll away! (I know, I discovered it once I had actually got as far as the green stars, div.)
1) Melt a few tablespoons of marmalade in a pan with some boiled water until you have a runny consistency.2) Paint this over your cake using a cook's brush. Cover the cake with rolled marzipan.
3) Use cool, boiled water to paint onto your marzipan before transferring your icing onto the cake. Leave to set for a day or two.4) Mix red icing and flower paste together to create your bow. Flower paste helps icing harden, so it's ideal for decoration. Roll very thinly, and cut strips long enough to cover the lengths of your cake. Create a cross for the ribbon on your cake.
5) Take a strip of icing/paste mix the same width as your "ribbon." Pinch in the centre, and fold both ends together. Take another short strip of "ribbon" icing and wrap around the centre of the bow to hide the folds.
6) I used two plastic cylinders to keep the shape of the bow overnight, then gently remove them once you know they're hard.
7) Affix to your cake using vodka.
8) Paint your cake in a mixture of a tsp of vodka and a touch of white edible shimmer powder. This creates a nice pearly effect, and also a glue for your stars.
9) Cut lots of green star shapes using a small cutter and stick to the cake straight away.
10) Finish with royal icing piped around the edges.
Happy Baking and Happy Christmas! x


This is brilliant Kir! So proud :P
ReplyDeleteIt's better than I imagined when you were describing it to me, love it :D and if it were double chocolate or something else i'd love a bite ;) I'm sure Jims granddad will appreciate the effort as well as the scrumminess :) xx
Thankyou sweetness :D
ReplyDeleteI really need help making my page wider! But I want my own pictures in the background, I need to make some designer cupcakes or something :P
Love you lots xxx