21 June, 2012

"I Did it My Way!"


I love Frank Sinatra. I'm jealous of the guy that got this cake.

Very simple design - chocolate fudge cake with chocolate buttercream decorated with a "stage" and my handmade sugarpaste Sinatra and mic. I used my italic letter Tap-it's for the writing, which are now pretty much broken to death. Square and circular cutters were used for the music notes and the checkerboard stage. I won't dwell much on the cake this time. I was really happy with the figure I made, as the only real experience I'd had with sugarpaste figures before this was Fireman Sam and the skiing guy.

The way I make figures is in sections, using Flowerpaste which sets a lot harder and quicker thatn sugarpaste. I roll an oblong piece of paste together, then cut a slit about 75% of the way down for the legs, then I make a torso, and then finally a head and arms. I always skewer the torso to the legs with a small piece of dowel, and insert florists wire into the arms and head to keep them in place, too. I use edible glue to stick on the hands and any facial details. The mic has a long piece of florists wire going through it, so it stays upright.  I used PME Finishing spray over the entire cake and figures to complete the design.

Icing on the Top:
  • The execution of this cake is flawless, in my opinion. Everything is perfectly in order, with the letters spaced out evenly. Using such a contrast with black and white icing I expected a few more difficulties with colour smudges, etc. however this was a pretty clean-cut cake for me :)
  • Frank is so cute. I just wanna eat him. And you can! (Once you remove the wire and dowel, of course!)
  • I had a lovely message from the recipient a few days later saying how good the cake tasted. I love hearing that best of all. At the end of the day, a cake can look fabulous but you're still gonna eat it so you want it to taste as good as it looks!!
Burnt Bits:
  • This picture was taken before I delivered the cake, and unfortunately I made the huge mistake of travelling in a car by myself with a very precariously-balanced handmade figure on top of a delicate cake. He fell over a few times, and I found myself having to turn back home and picking up a small dowel to fix behind Frank to make sure he didn't move :(
Nothing more to report. I've learnt my lesson, and at Christmas I delivered a cake with THREE figures with it - and asssembled it upon arrival, NOT before I travelled with it!

Happy Baking x

Choccywoccymegasuperyummyfabulous


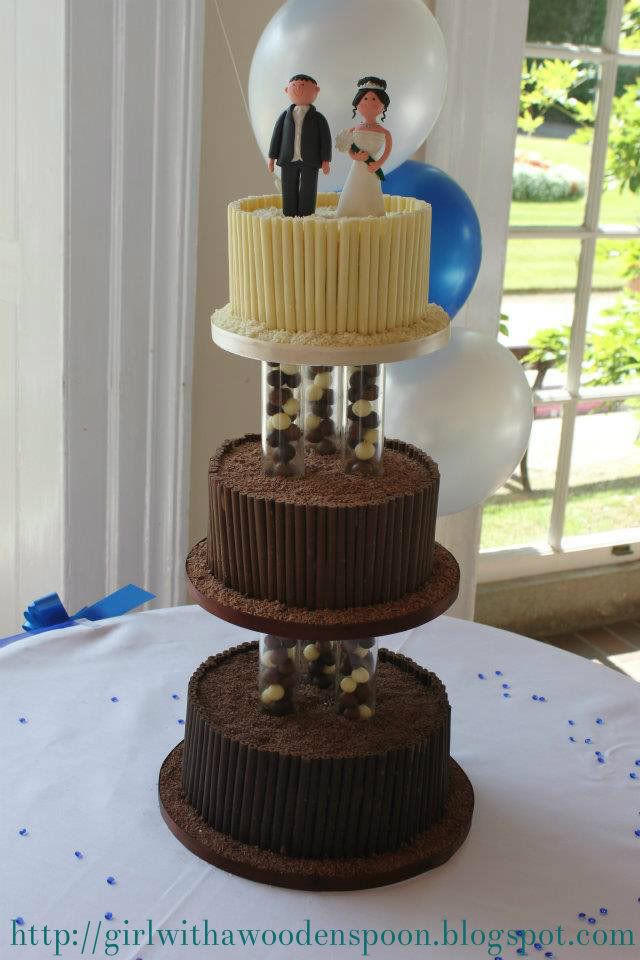
This was my first cake that I've used pillars with, and they're not the traditional plastic pillars you'd usually associate with a tiered cake. This cake was an order for the sort-of-step-sister of an old friend, and she had found a picture of this design online and wanted the same for her wedding. The bottom tier was a chocolate fudge cake with dark chocolate ganache, the middle tier was a vanilla sponge with milk chocolate ganache, and the top tier was a vanilla sponge with white chocolate ganache. All three tiers have their respective flavour chocolate cigarellos surrounding them, which is held in place by the ganache.

The pillars I used were clear fillable acrylic pillars, and they come in a range of tube widths and numbers. From the looks of the picture I was given as a guide to follow, the bride and groom believed the chocolate balls filled in the tubes to be Maltesers, but since I couldn't find dark or white chocolate Maltesers ANYWHERE in the middle of summer (usually you see them at Christmas time) they were happy to let me use rolled-up balls of chocolate Cocoform instead. They were only used as decoration anyway, not to be eaten. Now these pillars were extremely expensive - about £50 from the cheapest places online! - but lo and behold my amazing cake shop owner had these in stock that she lets out to hire, and she let me have the two of them for the weekend for a mere tenner! Score!

I really enjoyed the assembly of this cake, from fixing on the chocolate cigarellos to adding in the chocolate shavings to bring the whole piece together - the entire look really worked well and I was so pleased when it was finally assembled at the wedding venue.

However, I mentioned this was a summer wedding cake. When I arrived at the venue, I was horrified to discover that the cake table had been set up in direct sunlight - and it was a scorching day!! I mean - it's a three tier chocolate wedding cake! And they wanted me to leave it to melt?! You can even see in the picture that it's amazingly bright outside! So after a slightly heated discussion with the wedding co-ordinator, we agreed that the table would be moved into the shade whilst I assembled the cake, and when it was time for the Bride and Groom to come into the Reception room that they'd move the table back where it belonged. I really didn't like this idea. Cakes are extremely fragile, and I had to leave it in the "trusted" hands of the venue staff. So I left the cake in this condition as you see above. But I have no idea what happened later in the day... And unfortunately the B&G were extremely unhappy that by the time they got to the cake that evening it apparantly looked like "the leaning tower of Pisa," as they put it :( Obviously this left my confidence extremely knocked for six, as I knew that I had stacked the cake as carefully as I always would - using dowels and cake boards between each tier to support the weight of the next one. I can only assume that when the staff moved the table with cake later, something jigged and moved...

I suppose this is just one of the punches I have to roll with when working in this business - after delivery the cake is out of my hands and I just have to hope and pray that nothing happens to it.

Icing on the Top:
  • It looks brilliant, I'll even say it myself. I was so pleased with how good it turned out that my mum treated me to lunch as a congratulatory celebration on delivery of my first real wedding cake. So she was witness to everything, by the way!
  • I received LOADS of compliments for this cake from friends and family. It kinda made up for hearing such a critisicm on one of my creations.
Burnt Bits:
  • This is the only cake that I've made to date that the recipient has not been happy with :(
  • Where some of the milk and dark chocolate Cocoform balls touched the white ones they left little smudges of chocolate. I'm a perfectionist, so I HATED those little dirty bits!
  • Chocolate is EXTREMELY difficult to work with in hot weather. When we moved the tiers onto the WHITE table cloth, a few of the chocolate shavings fell onto it and stained it slightly. We were able to fix this by flipping the table cloth over, and when it happened again we used the diamante table decorations to cover them, too.
  • The chocolate cigarellos come in all shapes, all sizes. Some are wider than others, and unfortunately this made them hard to line up next to each other in a uniform straight line. You can see where this hit worst on the bottom tier.
I was on such a high after the delivery of this cake that I can't believe how much that turned around in a few days. I hate this part of the business, disappointing people. I just hope next time that someone requests a chocolate cake that they ensure their cake table isn't in a position that could compromise the final presentation of it :( Something to consider, for all you engaged couples!

Happy Baking x

20 June, 2012

Peace and Love


Remember a while back when I talked about my friend Tash? Her lovely mum was true to her word and contacted me again for another commission for the school!

This time, they were having a very special visit from someone called "The Scary Guy." He's scary because he looks like this:

He's a motivational speaker, and a big deal in America. He goes to schools all over the country to talk about prejudice, racism, respect and having love for others. I think he's great! Now on an international tour of UK schools, too, Tash's mum wanted to provide him and the kids with some delicious treats for his Scary day at her school. This time the order was even bigger - TWO HUNDRED AND FIFTY cupcakes!!! I won't put pictures up of them, as they look exactly like the ones before, and plus I forgot to take pictures of them :D The only difference this time was that I was asked to provide about 25 undecorated cupcakes plus a load of goodies so that the kids could decorate them themselves. Sounds like a fun day of school to me...

She also asked me to come up with a cake for Scary Guy, something to say thankyou for him being there. As you can see, the guy is covered in tats, so I went with a heart-shaped (love) cake and used my ribbon roller cutter to cut strips of icing into 'scrolls' like you'd get in tattoos. The difference being, my scrolls had words of encouragement, like "peace" and "respect." Not "mum" like you'd expect on a biker dude.  

Icing on the Top:
  • He's famous in America - and he ate MY cakes!!
  • It's for a good cause!
  • Everything was super yummy, and I even got a hug from the school advisor that came to pick it all up! :P
Burnt Bits:
  • I still couldn't master the art of royal icing at this point, and my writing was too runny. It spread slightly, which you can see. It's not just a blurry picture.
  • The "scrolls" I made were too thin, which is a problem because I used white icing on top of red and the red shows through :(
  • I couldn't make the original delivery slot due to my old job not telling me about a shift I had that particular day. It was really unprofessional of me to have to cancel, and the order ended up getting picked up at 7am the day of the talk. I know Tash is a friend, so I really don't want it to seem like I was taking the piss. But seriously, I felt awful. Jim's mum, best friend and daughter-in-law all rallied around to help me ice the 250 cupcakes in record time, but thanks to Tash's mum being really lovely and understanding, I didn't need to rush. Thankyou to everyone for just being so amazing to me!
I later found out that the guy devoured most of the cake to himself, and really enjoyed it, so I got a bit of an ego boost there! :D Love for Scary!!

Happy Baking x

09 June, 2012

For an Old Wrench


So you saw in my last post that I was under a bit of pressure as I had that cake PLUS this one to do all in a day - my head was a bit fried by the end of the weekend as I ended up going to both parties, too!

I love this cake, it was such a talking point at the party! I delivered it to Jim's mum before we headed out to an engagement party, but the cake box was sellotaped down so I could give the cake the big reveal to her when we came out later in the evening.

For christmas my darling bestie, Abby, gave me a rude cake book. One of the cakes is a builder's bum, and I showed the book to Jim's mum later - she loved the builder's bum and made a joke about having a plumber's bum cake for her birthday and then left it. Of course, I took note on what she said and when it came to her birthday I made sure I was the one to be making her cake as I had a suprise for her. You see, she's training to be a plumber, and she's bloody brilliant at it!

So I made the necessary changes to this cake to make sure everyone knew it was a female bum by adding in the frilly thong and sparkly (although you can't see it) plumber's tools. I used my ribbon cutter tool with the serrated edge to give the stitching effect on the jeans and plumber's belt, and dabbed edible lustre dust in Terracotta on the bum to give the "dirty" effect. I marbled brown and white icing to give the effect of a dirty rag and tucked it into the jeans pocket, too.

Icing on the Top:
  •  Jim's mum, Tanya, was over the moon with her cake, and couldn't stop showing her guests. Always a good point :)
  • I'm really pleased with how much detail I gave the bum. Having a rather nice one myself, I pride myself on the detail in that area. Haha!
  • Another successful Pyrex bowl cake!
Burnt Bits:
  • I made this chocolate cake about a week in advance because I knew how busy I'd be with the engagement cake, too. I then froze the cake, which I've read a lot about. It didn't taste bad - it was nice - but fresher is always better.
Still to this day, Tanya raves about her cake :)

Happy Baking x


08 June, 2012

For Better or For Worse...?


Quite possibly one of the worst cakes I've made.

Alright, I know it's not terrible. But it ain't great. People can say all they like that it was a great cake, but I know deep down they're thinking... WTF?!

This was for one of my best friend's engagement party. She is one of the sweetest people you will ever meet, and I feel so terrible for the way this cake came out. On their first wedding anniversary I plan to replicate this cake the way it should have been made so fear not! Hannah and Mark will get their perfect engagement cake one day! It should be noted that I'll also be making their wedding cake so I'll be sure to make that one perfect too!!

Icing on the Top:
  • This was a replica of their proposal, which I cried at when Hannah told me (not because she had a diamond ring, because I'm genuinely happy for her!!). Haha, no being serious. It was Hannah's 21st birthday at Glastonbury 2011 and Mark took her up on Glasto Tor and after much fumbling about in his pocket for the ring that his mum had SEWN to the inside of his trousers, he managed to pop the question to our beautiful Hannah. So Hannah and I agreed on this design for their cake.
  • The reason I don't like this cake is because there's too many inside layers of cake. Don't get me wrong though, you can argue that having too much cake is a pro, so I will argue that.
  • Hannah and Mark really are just the sweetest couple and couldn't stop gushing about it. I even got a mention in the toasts, so I'm guessing they liked it.
Burnt Bits:
  • It's shit.
  • Normally, I bake two layers of cake and sandwich them together with buttercream. For some reason I was convinced that these layers wouldn't add enough height to the cake so I carried on baking and gave them a triple-layer cake on each tier. Unfortunately, this didn't work in my favour due to the amount of buttercream I sandwiched between each layer, and this led to it spilling out of the sides of the cake once I covered the cake in icing. The weight of the icing just helped push out even more buttercream, and gave this horribly bumpy edge to each tier.
  • I thought that by adding a string of trees around the tiers it would help disguise this. It didn't, and I don't even think there are many trees at Glastonbury festival.
  • I was under a lot of pressure to make this cake. I had stupidly agreed to also make my then mother-in-law's birthday cake for the same day, and suffice it to say, I put more effort into her cake :(
  • I couldn't get the consistency of the royal icing right when I was finishing off the bottom of the tiers, and a lot of it melted into one another instead of maintaining their 'star' shapes.
  • The 'Glastonbury' sign was supposed to be made out of flowerpaste, so that it would harden and I would be able to stand the letters up on the side of the tiers. I didn't plan this very well, and the letters I was cutting out were very wonky, messy, crappy... So I just printed off a picture of the sign and cut it out, layering the letters onto card and affixing them to the cake with cocktail sticks stuck to the back of the letters.
  • Hannah and Mark are HUGE compared to the sign. Evidently not good to make out that they are in fact, giants.
I will now post about the other cake I made that day to make myself feel better about my cake-making skills. Boo me!

Happy Baking x

07 June, 2012

This Cake Has Been Left Blank For You To Write Your Own Message

Sorry, it's a boring one guys!


It's nice that once in while someone asks for a simple cake - just something with a personal message on it. These cakes were both given as gifts and I was instructed for both of them to just have something simple on there.

I really don't have an awful lot to say about either of them, both recipients were pleased with them - but I know in my heart of hearts they could have been just a bit better... And I'd promised to show you everything I've done. Lucky you!

Icing on the Top:
  • It was good practice despite a simple design for each of them. One was a 6" vanilla sponge cake and the other was a 8" fruit cake. It's not often I make small cakes and they're a right royal pain in the ass to cover in icing as you don't have a lot of control over them like you would larger cakes. Also, I don't make too many fruit cakes unless someone wants one in one of the tiers of a wedding cake, or if it's christmas.
  • When the fruit cake was baking it made my flat smell like christmas in Summer :)

Burnt Bits:
  • I hadn't done an awful lot of piping work before the pink cake - that's something I know I need to improve on and the next time I cover a cake dummy I think I'll try some intricate icing designs. You can tell that my font sizing is all over the place on this one and if I had just taken the time to plan ahead and space out my letters then it could have been really lovely. Luckily, it's a funny message so I think it looks okay a bit skew-whiff!
  • Remember what I said a few posts ago about how if you use too much Finishing Spray on a white cake it gives it a yellowy finish? Exhibit A: The Yellowy/White cake.
It'll be more interesting next time, I swear!

Happy Baking x

06 June, 2012

Cake Baby


I had a lot of fun on this baby! (Haha, pun intended!)

Now my dear friend, Jodie, had a most unusual request for this cake. It was for her best friend's baby shower, and she wanted something... A little unusual. She had seen pictures of "funny" baby shower cakes, and wanted one like that as you always see the same baby pink/baby blue teddy-bear infested pile of vom. However, these weren't "funny" cakes - they were downright horrid! (Picture this cake, with a hand sticking out of the belly holding a sign saying "Nearly there!" Um, no. Just no.)

I managed to convince her to go a little more conservative, and at most I allowed the inclusion of painted-on stretch marks at the bottom of her tummy. I did add some on her boobs, too - but they just looked like stink marks you put on a cartoon. So I promptly removed them with the aid of vodka and a cotton bud :)

Icing on the Cake:
  • The shape of the cake was created by baking the boobs and tummy separately in glass Pyrex bowls. I know you can get dome-shaped cake tins, but when I went to hire them from my usual place, someone already had them. It was the cake shop owner's idea to bake the cakes in bowls - and when I asked if that was safe to do she reminded me that we bake everyday in glass (casseroles, lasagnes etc. Duh!). I greased the bowls first in Cake Release Spray and filled each bowl to about 2cm below the rim to allow for the cakes to rise. I always bake any cake for 15 minutes uncovered first, to get a lovely golden glow across the top. Then I cover the cakes in tin foil and I baked for another 40ish minutes (depending on the size of your bowl this will vary cooking times. Remember your bowls are DEEP and you want them cooked right through!!!
  • I got loads of compliments just on the basis of the babydoll design. Obviously a hit! I love creating sugarpaste bows so I had to include one on there somewhere!
  • This was lemon drizzle cake. 'Nuff said. Mmmmmm.
Burnt Bits:
  • As previously stated, the bowls I baked these in are very deep, which is annoying as you don't want to keep removing the cakes from the oven too many times to check if they're done. Always check them with a skewer. When you come to half the cakes to spread a filling inside you'll soon find out if you took them out too early (which I've done!).
  • I don't like the quality of the picture. I used the PME Clear Finishing Spray again on this one but it just looks wet.
  • This cake was huge. I used a 14" x 16" cake board just to give you an idea of the size. It was only meant to feed about 20 ladies so I'm assuming there was lots left over. No biggie though - better to be bigger than too small.
  • The hands. Jodie wanted them on there. I don't like them. That's all.
On a final note, I want to give a special mention to Jodie's adorable 2 year-old, Fliss. Upon Jodie turning her back on the cake, Fliss proceeded to push her toy box up against the table the cake was on, climb up on said box and promptly POKED the cake in curiosity. Needless to say I had frantic messages from Jodie asking what to do to salvage the cake, but by the time I realised what had happened she had managed to sort it out! Her daughter really is adorable though, so I'll let her off :P

Happy Baking x