11 February, 2011

Peppa Pig Cake

Happy 4th Birthday Charli!
A friend at Uni asked me to do my FIRST COMMISION! for her daughter's birthday, and she was so excited by the results of this Peppa Pig cake that she's asked me to do her other daughter's birthday cake in March. I'm such a busy bee at the moment! I'm about to start a Valentine's cake tomorrow and then another next week... Ahhh!!

Anyways, so this is the progress of how I went from sponge to pig. Sorry guys, I really did try to do a video tutorial like I mentioned before, but trying to hold a rolling pin and a £600 camera at the same time as shooting a mini-vid is very hard. Ah well, when I'm rich I'll just have to hire someone to film me :P
I actually traced Peppa straight from the pc screen onto some tracing paper and then used that as a guide for the three parts of the cake, then split those parts in two horizontally to add jam and buttercream. Those three parts were then coated in a crumb coat of buttercream and popped into the fridge for 1/2 an hour. I used white rolled icing to do the first coat of icing, which set overnight. Then I used three shades of icing to create her skin, tiara and dress. Everything else was handmade and stuck on with Sugarcell. (You can't see it very well but I did use white lustre dust on the stars, too.)

I have a massive wishlist of cookery items that I really need to get more professional at these cakes, and one of them I really could have done with for this cake. A Sugarcraft gun would have produced a perfect log shape for creating her darker pink outline on her face, and also the outline of the fairy wings. Unfortunately it's just impossible to create logs that long and symmertrical without them falling to pieces. I hope Jim's got the hint and has bought me one for V. Day :D

More to come soon, Happy Baking! x
P.s What do you guy's think of my make-shift business cards? I'd like to get some properly made up when I have the money and a solid idea - maybe replace the damask picture with my own sketch of a cake/cupcake? (Yes, I'm saying cupcake again. I suppose I'm not going to be very popular if I still refer to the them as buns. Which they are...)

02 February, 2011

Happy ??th Kate!

This is most definitely one for the majority of my followers. Thanks to 
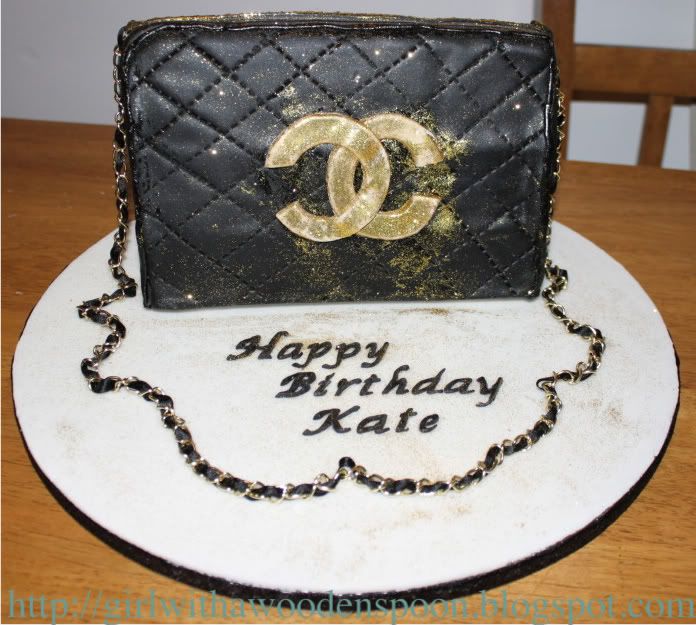
Abby, I get a load of traffic from fashion and beauty bloggers. Hope you like this one, I'm not going to go into immense detail from now on about my big cake projects - unless I come across a really amazing recipe. The story behind this cake is that it was made for my other half's auntie. She recently hit a big milestone birthday, but she has no idea that anyone other than her own sister knows her true age... So I treated her to a nice cake, and she love love LOVES designers - this cake is very fitting for her :)
However, this particular cake was fairly hard to complete - and included a hysterical breakdown in my kitchen that my mother had to calm down because I broke my new icing syringe on the first use... Drama drama drama. I used some new techniques too, so I'll tell you about them:

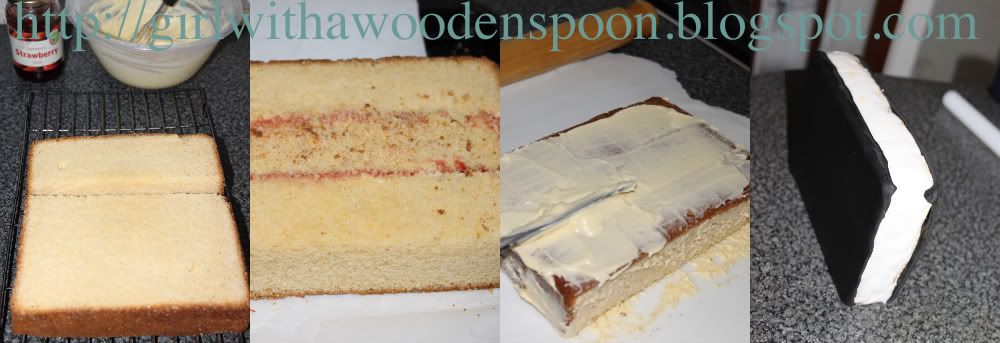
- This was the first time I had covered a cake board in sugarpaste icing. Really easy to do, just roll out enough icing to cover your cake board, brush over a titchy bit of water onto the board and transfer your icing onto the board. Cut off any excess from the edge of the board and leave to set OVERNIGHT. Very important you let it set, as the next day when you assemble your cake you won't leave any fingerprint impressions in the icing.
- This was the first time I used edible glitter. The cake shop lady told me you can roll it into the sugarpaste, but I didn't find this very effective, unless you use a massive amount of glitter, which is just a waste. I used Sugarcell for the first time, too. This is effectively a cake glue, which sets like wallpapering paste and you can paint onto cake surfaces and icing - this is how I got the glitter to stick to the icing and how I got the zip and Chanel logo to stick, too.
- This was the first time I got to use my new ribbon cutter tool. At £11 it wasn't cheap for a tiny contraption with different wheels to create even ribbons. There was a serated edge wheel that I used for the stitching effect of the quilted purse. Effective!
This cake isn't perfect, I know. I know it tilts, and you can see the individual layers of sponge through the icing. I think I just got pissed off with it really and just 'made do' in the end. Once I attatched the logo onto the cake, glitter got EVERYWHERE. So it was a case of sprinkling glitter all over the entire piece to make it fit in. Hmm. I think I should have used dowels in the sponge too, since it has no support in it.

I may include some videos soon. I have another Uni assignment this term to do with interactive media. Hmm, food for thought, anyways...

Happy Baking x

26 January, 2011

Chocolate Melt in the Middle Buns

I say buns... I'm sick of the word cupcake. I'm British. And after choosing to do a bloody dissertation on that fricking subject I refuse to refer to fairy cakes as them. Anyone with me on this?
Anywho, ranting aside, Abby and I decided to make some scrumptious buns the other day - chocolate melt in the middle with chocolate buttercream (not frosting ;) ) and sugar decorations. I can't remember the recipe as such, but it doesn't matter - any general chocolate bun mixture will suffice; the only difference you make for the "melt in the middle" part is by adding a square of your favourite chocolate into the middle of the buncases when you've filled them about a 1/3 of the way full.
The recipe we used did advise to eat them straight away, and we did for the image above, and they were extremely yummy! However I waited a few hours before sharing with my other half, and the square of Galaxy I'd used had turned back to a solid :(

Luckily, as an alternative, I know how to make the real melt in the middle puddings. I'd try using a melted chocolate and double cream mixture in the centre of each fairy cake next time - preferably dark chocolate even though I don't like it on it's own - it does add to the flavour.
I've got a cake treat for the majority of my followers in the next post ;) Hopefully it will turn out alright, it's setting at the moment...

Happy Baking x

11 January, 2011

Chocolate Roses

I've recently posted on my Facebook a mass call out to anyone who wants a cake doing, and suprisingly, I've already got another wedding cake to do this year! Ahh!! What's more, it's my friend Jodie's cake - she's a complete chocoholic and so she wants an EXTREMELY chocolatey cake. There is a little shop on our seafront that specialises in chocolate celebration cakes, but to be honest they are totally overpriced and frankly quite rude in there, too. No wonder Jodie came to me!

With this in mind, I had to get a riddle on with getting to grips with cocoform. She doesn't know exactly what she wants, but I best be prepared for whatever she asks for. I dabbled in cocoform for my mum's 50th cake, but mostly that was just rolling it over a cake, with a little white chocolate bow. I need to challenge myself.. So I made chocolate roses today. I got a tiny pink mixing bowl complete with wooden spoon and sponge mix for christmas, and didn't want to waste the sponge mix. I made a few cupcakes with the mix, and decided to decorate with chocolate buttercream and chocolate roses.

To make 7 large chocolate roses, you will need:
- 100g Milk Chocolate Squires Modelling Chocolate. This comes in at around £5 for a pack of 150g - so use wisely!
- Cling film

Method:
1) Knead the cocoform until pliable. The natural cocoa butter will lubricate the paste, so there is NO NEED for Trex or icing sugar.
2) Take off little pieces of cocoform and form into balls a little smaller than Malteasers, but all different sizes.
3) Tear off a piece of cling film, and place a few balls of cocoform onto the film. Pull over one end of the film to cover the balls.
4) Flatten each ball using the palm of your hand, then carefully smooth over two thirds of the petal pieces using the edge of your thumb. This will make it easier to mould the petals to make them look more realistic.
5) Take a small petal and curl it around itself using your thumb and forefinger. This will be the centre of the rose.
6) Gently add more petals to the centre of the rose, attaching them naturally with the cocoa butter in the cocoform. Use bigger petals towards the end of the rose, and curl the edges to make them a little wilted.
7) Cut off the bottom of the rose once finished, you will find that it gets quite fat with every layer of petals you add. I find that 8 petals is the average for every rose.
Please note, that as much as you may love chocolate, cocoform does not taste exactly like your favourite bar of Dairy Milk. It has glucose in the mixture to make it malleable, so it won't be exactly the same, but it's still edible. It's like the chocolate you get in your advent calendar every christmas - it doesn't taste just right, but you still eat it anyway :P

What do you think? Stick to icing flowers or do these look alright for a first-timer? :D
Happy Baking x