Showing posts with label Clear Finishing Spray. Show all posts

21 June, 2012

"I Did it My Way!"


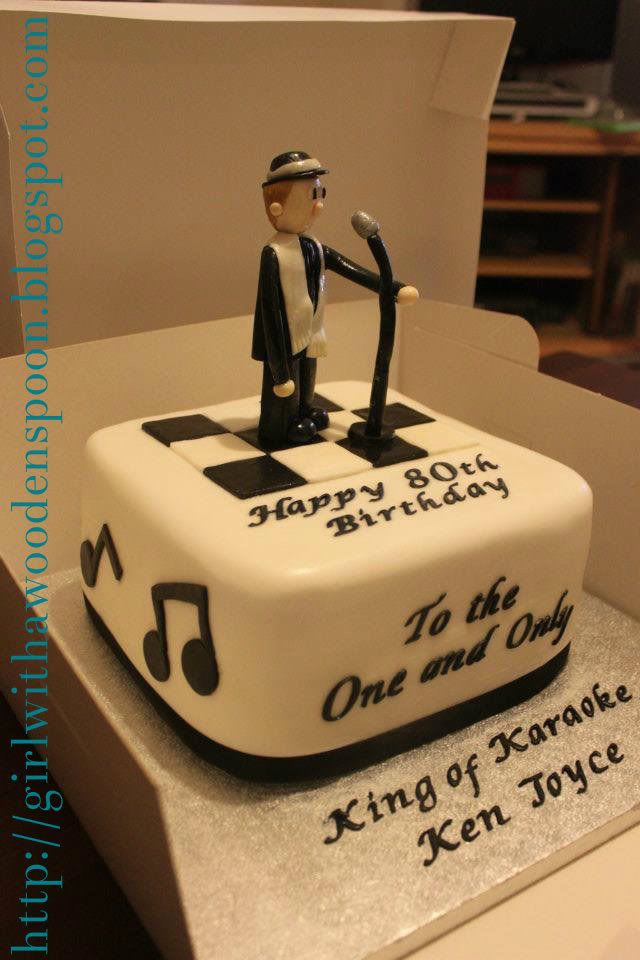
I love Frank Sinatra. I'm jealous of the guy that got this cake.

Very simple design - chocolate fudge cake with chocolate buttercream decorated with a "stage" and my handmade sugarpaste Sinatra and mic. I used my italic letter Tap-it's for the writing, which are now pretty much broken to death. Square and circular cutters were used for the music notes and the checkerboard stage. I won't dwell much on the cake this time. I was really happy with the figure I made, as the only real experience I'd had with sugarpaste figures before this was Fireman Sam and the skiing guy.

The way I make figures is in sections, using Flowerpaste which sets a lot harder and quicker thatn sugarpaste. I roll an oblong piece of paste together, then cut a slit about 75% of the way down for the legs, then I make a torso, and then finally a head and arms. I always skewer the torso to the legs with a small piece of dowel, and insert florists wire into the arms and head to keep them in place, too. I use edible glue to stick on the hands and any facial details. The mic has a long piece of florists wire going through it, so it stays upright.  I used PME Finishing spray over the entire cake and figures to complete the design.

Icing on the Top:
  • The execution of this cake is flawless, in my opinion. Everything is perfectly in order, with the letters spaced out evenly. Using such a contrast with black and white icing I expected a few more difficulties with colour smudges, etc. however this was a pretty clean-cut cake for me :)
  • Frank is so cute. I just wanna eat him. And you can! (Once you remove the wire and dowel, of course!)
  • I had a lovely message from the recipient a few days later saying how good the cake tasted. I love hearing that best of all. At the end of the day, a cake can look fabulous but you're still gonna eat it so you want it to taste as good as it looks!!
Burnt Bits:
  • This picture was taken before I delivered the cake, and unfortunately I made the huge mistake of travelling in a car by myself with a very precariously-balanced handmade figure on top of a delicate cake. He fell over a few times, and I found myself having to turn back home and picking up a small dowel to fix behind Frank to make sure he didn't move :(
Nothing more to report. I've learnt my lesson, and at Christmas I delivered a cake with THREE figures with it - and asssembled it upon arrival, NOT before I travelled with it!

Happy Baking x

07 June, 2012

This Cake Has Been Left Blank For You To Write Your Own Message

Sorry, it's a boring one guys!


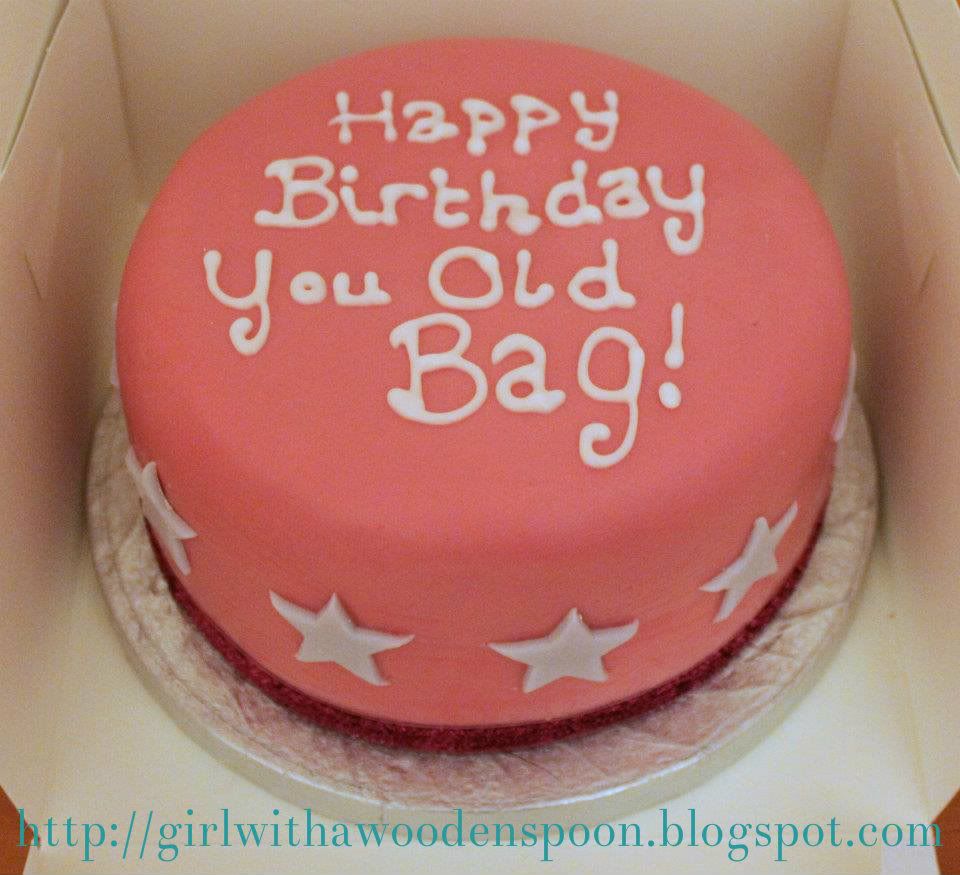
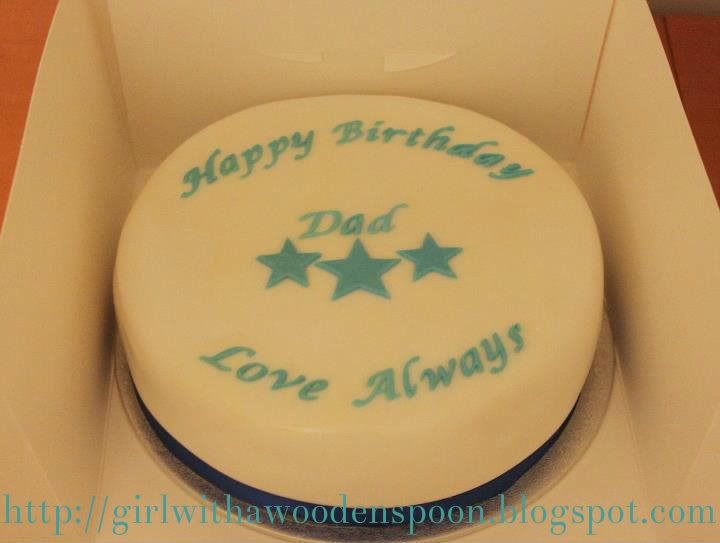
It's nice that once in while someone asks for a simple cake - just something with a personal message on it. These cakes were both given as gifts and I was instructed for both of them to just have something simple on there.

I really don't have an awful lot to say about either of them, both recipients were pleased with them - but I know in my heart of hearts they could have been just a bit better... And I'd promised to show you everything I've done. Lucky you!

Icing on the Top:
  • It was good practice despite a simple design for each of them. One was a 6" vanilla sponge cake and the other was a 8" fruit cake. It's not often I make small cakes and they're a right royal pain in the ass to cover in icing as you don't have a lot of control over them like you would larger cakes. Also, I don't make too many fruit cakes unless someone wants one in one of the tiers of a wedding cake, or if it's christmas.
  • When the fruit cake was baking it made my flat smell like christmas in Summer :)

Burnt Bits:
  • I hadn't done an awful lot of piping work before the pink cake - that's something I know I need to improve on and the next time I cover a cake dummy I think I'll try some intricate icing designs. You can tell that my font sizing is all over the place on this one and if I had just taken the time to plan ahead and space out my letters then it could have been really lovely. Luckily, it's a funny message so I think it looks okay a bit skew-whiff!
  • Remember what I said a few posts ago about how if you use too much Finishing Spray on a white cake it gives it a yellowy finish? Exhibit A: The Yellowy/White cake.
It'll be more interesting next time, I swear!

Happy Baking x

05 May, 2012

Full Steam Ahead!

So in this post I've decided to include two cakes I've made. The reason being for this that I wanted to go right back to the beginning and blog about all the cakes I missed, and talk about what I liked, where I went wrong, etc. But the next cake that was on my list was a super easy cake, and in my personal opinion I couldn't have done it any better - even if I do say so myself! You may think I'm being big-headed, or you might look at it and think it's crap - but I really do try and find flaws with every cake I've made, and this one I couldn't. So I'm pleased with how it came out, and I'm proud of me. I'm allowed to be sometimes :)

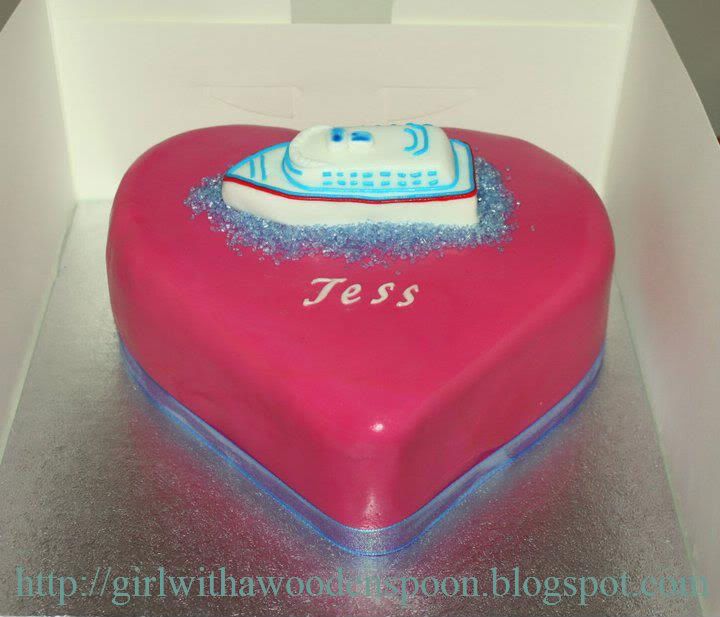
This was a chocolate fudge cake that was ordered due to a recommendation from another client - apparantly her mother-in-law couldn't get enough of her cake (it was the purple butterfly cake from a previous post!) and decided to order this one for her friend who was leaving for a cruise. Simple - she wanted a pink heart cake, with her name on it, and a sugarpaste cruise ship. Which I delivered to the best of my ability and I love the simplicity of it! The ship was relatively easy to mould out of icing, and I added the blue and red detail on it using my sugarcraft gun and the pinhole disc. I really do love that thing. I placed it onto a bed of blue sprinkles for the sea, which I think gave it a really sparkly and girly touch. I finished the cake off with PME Clear Finishing Spray, which I recommend completely but you do have to use it sparingly as it can give a horrible yellow finish to pale-coloured cakes (thus ruining some of my future cakes :( ).


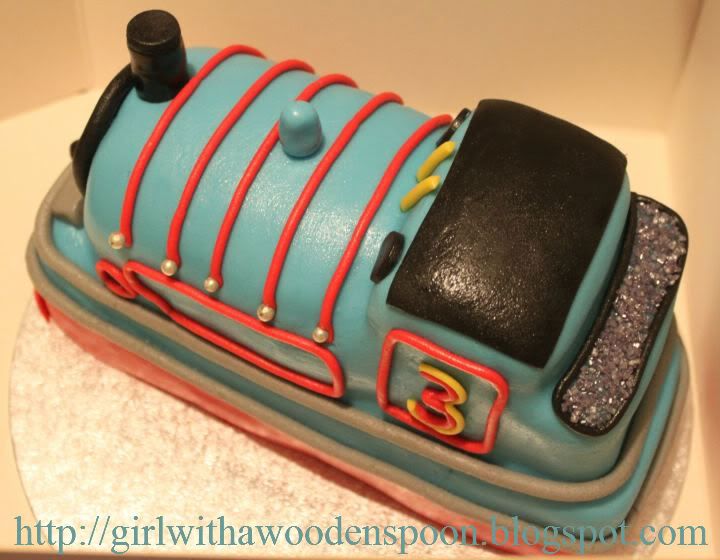
This was one of my favourite cakes I've created. It was for my adorable second cousin, Rhys, who is Thomas the Tank craaaaazy. To this day I have no idea how I managed to mould the actual train shape together using chuns of cake, but I think I did a pretty good job considering! Now I will tell you a secret though, I cheated. :O I actually bought a jam and vanilla buttercream roly-poly cake from Asda to get the tubey shape of his body. I know, I'm going to hell. It was in their basics range, too. :O again!

The rest of the vanilla cake I baked in a loaf tin, just like I did when I made my Fireman Sam cake. I then cut him down to size, took a bit from here and there and - voila! One TtTE cake at your disposal! I primarily covered him all in the lovely blue icing, then added in all the extra detail using a selection of tools like my sugarcraft gun (agaaaaiin), my ribbon cutter and just my general awesome hands. Haha. P.s, I've used the number '3' on the side of the cake as it was his 3rd birthday, not because I'm a complete retard and don't know that Thomas is actually engine number 1. Duuuh.

Icing on the Top:
  • Using simple supermarket home-baking decorations like silver dragees and coloured sprinkles to add to the detail really tipped the whole design off.
  • Every single section of the cake was edible, which is a huge thing considering how much detail is on there :)
  • He just looks so happy.
Burnt Bits:
  • The cheating part. Naughty Kirsten.
  • He doesn't have any wheels. I don't know why. I think I realised this just as I was boxing him up, but just thought "eh, never mind, there's no track anywho."
  • There's no track. I could have really gone to town on the overall finish by covering the cake board in icing and making up a track and all sorts. But I didn't, because I just couldn't be bothered.
  • He isn't completely to scale, which is very noticeable. I didn't realise this until I was adding in the silver tubing around the edge of the train, when it starts off quite low on one side, but a lot higher on the other. My bad.

Again, I finished off this cake with the PME Clear Finishing Spray. I like to use it on cakes that have a lot of detail on it, as I make all the detail parts separately and then add them on right at the end. This means that I usually use a separate workspace doused in icing sugar to dry the pieces out, but of course the pieces also get covered in a fine layer of icing sugar - which ain't a good look. The finishing spray disolves the icing sugar, giving the cake the pristine look that I always love at the end of a good cake. But as mentioned, use it sparingly on lighter cakes, and if you do have to use a lot to get rid of any excess icing sugar then maybe think next time how you can eliminate as much of it before transferring it to the cake. I use a blusher brush for big pieces of detail (never used with blush, of course. It has only ever been used for cake purposes, I assure you!!) Also, another good tip is to cover as much of the surrounding surfaces and cake board as possible, preferably with kitchen roll. If the spray gets onto any surfaces like your table tops or turn-tables, it is a BITCH to wash off. It is almost like a permanent edible glue. Not nice. And if it gets onto your cake board, wipe it off immediately with a piece of damp kitchen roll. If you let it dry out and then try and wipe it off, you'll ruin the cake board.

At the end of the day, I created two pretty damn good cakes. Both recipients were extremely pleased (Rhys especially!) and I was very happy with them :) Go me!

Happy Baking x

06 August, 2011

My Week in Cakes

I know a lot of you have regular posts about your week, and it usually involves photos and a brief description of what's going on.. so I thought I'd do one just for this particularly busy week I've had! I was supposed to be having a week off work for holiday but it just turned into a mad baking session! Business is booming here at Cakes by Kirsten, and I'm getting orders all the time! :D Remember to check out the Facebook page here, a 'like' is all it takes to get the word around :)
1) Sherelle's 21st shoe box cake; the shoe and roses are made out of Flowerpaste and finished with PME Clear Finishing Spray! 2) Luke's 18th Bra Cake; I got a call at 11am, the customer said the original cake was involved in an accident and needed another one by 6:30pm. I got there at 6pm. BOOM! 3) These vanilla cupcakes with vanilla buttercream are decorated with general supermarket sprinkles, but were sold to raise money for Breast Cancer Care! Over £230 raised!! 4) This chocolate fudge cake with chocolate buttercream cake is finished in the style of my Hello Kitty cakes, with edible sparkles. The tubing around the edges was created using my oh-so-nifty sugarcraft gun! 5) As simple as this victoria sponge is, I think it's flawless in my opinion! The flowerpaste numbers are finished with non-toxic glitter.

There you have it, a week in the life of a cake designer :) Children's cakes and a Glastonbury-themed engagement cake coming soon!

Happy Baking x